Golioth’s web console has a super easy and intuitive way to send Over-The-Air (OTA) updates to devices in the field. But for ultimate flexibility, you can choose to use the Golioth REST API for managing OTA firmware updates.
Every IoT device should have the ability to update firmware remotely. OTA is a crucial feature for fixing bugs and keeping fleet security up-to-date. But the device itself is only one half of the equation, you also need a management tool to get the new firmware to the device. Golioth is that management tool, and every one of our features are available using our REST API. Today we’ll take a look at how firmware update artifacts and releases work, using Python for the demonstration.
Overview of OTA from the Golioth Console
Before jumping into the REST API, let’s take a quick look at the Golioth Console OTA flow to help better understand the abstract concepts. There are two parts to rolling out an OTA update: artifacts and releases.

The artifacts screen shown here facilitates the upload of the firmware binary that will be served to the devices in your fleet. During the upload process you assign a package name (usually main) and version number (e.g. 1.0.1), with an optional setting for Blueprint (a way of grouping device types on Golioth)
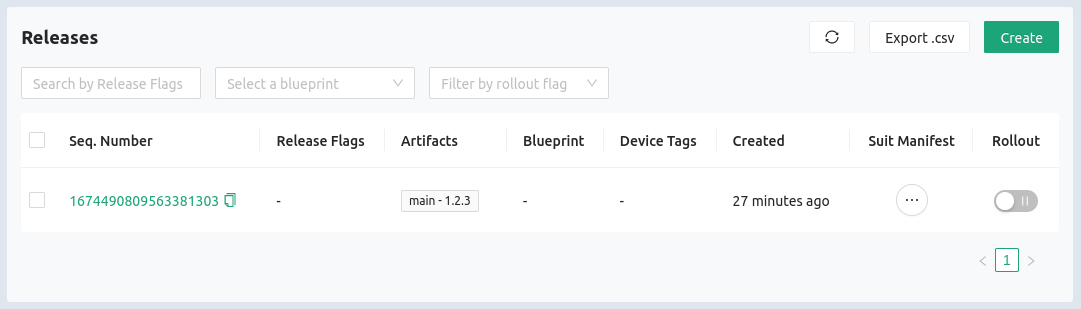
Creating a release is the second part of creating an OTA update. You can select Blueprint and Device Tags to narrow down which devices are being targeted. The release is associated with an Artifact (uploaded in the previous step). Optional “release flags” are a way to associate some additional information about the release.
Releases include a rollout toggle button. This is a way to stage a release and devices will only be notified when the rollout toggle is turned on. If you ever need to go back to previous firmware version, this button serves as a one-click rollback!
Creating OTA Artifacts and Releases with the Golioth REST API
Now that we’ve reviewed Artifacts and Releases, let’s use the REST API to create some!

First off, the Open API section of our Docs is the best place to test out your REST API calls. Just click the Authorize button at the top and give it an API key from your Golioth Project. From there you can try out the commands live on that page.
Python API calls
import requests
import base64
For this demo I’ll use Python 3.10.6 to make the API calls. This is pretty easy to do using the requests and base64 packages.
Uploading an Artifact
def upload_artifact(api_key, proj_id, version, package, filename):
    artifact_upload_url = "https://api.golioth.io/v1/artifacts"
    headers = {'x-api-key': api_key}
    with open(filename, 'rb') as f:

        data = {
            "projectId": proj_id,
            "content": base64.standard_b64encode(f.read()).decode(),
            "version": version,
            #"blueprintId": "string",
            "package": package
            }

    jsonData = requests.post(artifact_upload_url, json=data, headers=headers).json()
    if 'data' in jsonData:
        if jsonData['data']['version'] == version:
            print("Artifact {}-{} created successfully for project {}".format(package, version, proj_id))
    elif 'code' in jsonData:
        print("Error code {}: {}".format(jsonData['code'], jsonData['message']))
    return jsonData
The artifact upload requires the API key and project name. The package name is usually main and semantic versioning is used for the version number. I have not assigned a Blueprint in this example but I did leave a commented line if you choose to do so.
>>> result = upload_artifact("V010sGuWtXXM1htPCHBjLGfrW6GlsKDt", "developer-training", "1.2.3", "main", "new_firmware.bin")
Artifact main-1.2.3 created successfully for project developer-training
>>> import json
>>> print(json.dumps(result, indent=4))
{
    "data": {
        "id": "63ceb040c345ce2e0256ac30",
        "version": "1.2.3",
        "package": "main",
        "createdAt": "2023-01-23T16:05:20.235Z",
        "updatedAt": "2023-01-23T16:05:20.235Z",
        "binaryInfo": {
            "digests": {
                "sha256": {
                    "digest": "0b101d7b0ad1330ec49471d6feb0debc02e022a99e839c7951a446c1539802e6",
                    "size": 32,
                    "type": "sha256"
                }
            },
            "headerSize": 0,
            "imageSize": 1219152,
            "tlvTotalSize": 0,
            "type": "default",
            "version": ""
        },
        "size": "1219152"
    }
}
A JSON packet is returned when the upload is successful. It includes all pertinent information for your newly created artifact. This includes the id of the artifact which is needed to create a release.
Creating a Release
def create_release(api_key, proj_id, artifact_id):
    release_url = "https://api.golioth.io/v1/projects/{}/releases".format(proj_id)
    headers = {'x-api-key': api_key}
    data = {
        #"deviceTagIds": [ tagId ],
        "artifactIds": [ artifact_id ],
        "rollout": True
        }

    jsonData = requests.post(release_url, json=data, headers=headers).json()
    if 'code' in jsonData:
        print("Error code {}: {}".format(jsonData['code'], jsonData['message']))
    return jsonData
The release is created using the API key, project name, and artifact ID. In this example I’ve chosen to rollout the release at the same time as it is created, so the devices will be notified immediately that there is a new OTA firmware version available.
>>> result = create_release("V010sGuWtXXM1htPCHBjLGfrW6GlsKDt", "developer-training", "63ceb31ac345ce2e0256ac31")
>>> import json
>>> print(json.dumps(result, indent=4))
{
    "data": {
        "id": "63ceb3b9c345ce2e0256ac32",
        "createdAt": "2023-01-23T16:20:09.563Z",
        "updatedAt": "2023-01-23T16:20:09.563Z",
        "releaseTags": [],
        "deviceTagIds": [],
        "suitManifest": {
            "authentication-wrapper": [
                {
                    "algorithm-id": "sha256",
                    "digest-bytes": "2a3efb45029dc5d23cf0adf5e260ba53c9a78266b9ee28bdbf4ef20b43a2d6c7"
                }
            ],
            "manifest": {
                "common": {
                    "common-sequence": [
                        {
                            "id": "set-component-index",
                            "value": 0
                        },
                        {
                            "arg": {
                                "class-id": "53f7395e-0825-5970-badb-cc7158e49eaa",
                                "image-digest": {
                                    "algorithm-id": "sha256",
                                    "digest-bytes": "0b101d7b0ad1330ec49471d6feb0debc02e022a99e839c7951a446c1539802e6"
                                },
                                "image-size": 1219152,
                                "vendor-id": "36323535-6565-3863-6430-346536653332"
                            },
                            "id": "override-parameters"
                        },
                        {
                            "id": "vendor-identifier",
                            "value": 15
                        },
                        {
                            "id": "class-identifier",
                            "value": 15
                        }
                    ],
                    "components": [
                        [
                            "[email protected]"
                        ]
                    ]
                },
                "install": [
                    {
                        "id": "set-component-index",
                        "value": 0
                    },
                    {
                        "arg": {
                            "uri": "/.u/c/[email protected]"
                        },
                        "id": "set-parameters"
                    },
                    {
                        "id": "fetch",
                        "value": 2
                    },
                    {
                        "id": "image-match",
                        "value": 15
                    }
                ],
                "manifest-sequence-number": 1674490809,
                "manifest-version": 1,
                "run": [
                    {
                        "id": "set-component-index",
                        "value": 0
                    },
                    {
                        "id": "run",
                        "value": 2
                    }
                ],
                "validate": [
                    {
                        "id": "set-component-index",
                        "value": 0
                    },
                    {
                        "id": "image-match",
                        "value": 15
                    }
                ]
            }
        },
        "artifactIds": [
            "63ceb31ac345ce2e0256ac31"
        ],
        "rollout": true,
        "sequenceNumber": "1674490809563381303"
    }
}
Upon success, all details of the release are returned by the REST API.
Get the Artifact ID (or Release ID)
def get_artifact_id(api_key, proj_id, version, package):
    artifact_url = "https://api.golioth.io/v1/projects/{}/artifacts".format(proj_id)
    headers = {'x-api-key': api_key}

    jsonData = requests.get(artifact_url, headers=headers).json()

    for i in jsonData['list']:
        a_ver = i['version']
        a_package = i['package']
        if version == a_ver and package == a_package:
            return i['id']
    return None
The artifact ID is returned when uploading a new binary. However, if you need to get it after the fact there is a REST API call for that as well.
>>> result = get_artifact_id("V010sGuWtXXM1htPCHBjLGfrW6GlsKDt", "developer-training", "1.2.3", "main")
>>> print(result)
63ceb31ac345ce2e0256ac31
Artifacts are identified by the version number and package name, but it’s the ID that is needed when creating a release using the REST API. The same approach is used to query the Release ID, just change the URL for the API call:
release_url = "https://api.golioth.io/v1/projects/{}/releases".format(proj_id)
Rollout, rollback
def release_set_rollout(api_key, proj_id, release_id, rollout_state):
    release_url = "https://api.golioth.io/v1/projects/{}/releases".format(proj_id)
    rollout_url = release_url + "/" + release_id
    headers = {'x-api-key': api_key}
    data = { "rollout": rollout_state }

    jsonData = requests.patch(rollout_url, json=data, headers=headers).json()

    return jsonData
Finally, you can rollout and rollback releases using the Release ID.
>>> result = release_set_rollout("V010sGuWtXXM1htPCHBjLGfrW6GlsKDt", "developer-training", "63ceb3b9c345ce2e0256ac32", False)
>>> print(result['data']['rollout'])
False
When rollout change is successful, you will receive the complete release manifest. Here I’ve printed just the state of the rollout.
IoT any way you need it
We’ve gone to great lengths to make it easy to build your IoT fleet. For most users this means a straightforward GUI experience on the web console. But every one of those features are available programmatically for those who need it. Today we showed OTA functionality, but you can just as easily create a custom UI for your fleet.
We’d love to hear about how are you using the REST API. Start a thread in the Golioth Forum to share your story!

No comments yet! Start the discussion at forum.golioth.io