The Zephyr shell is a powerful tool that we use all the time here at Golioth for prototyping and troubleshooting. But it’s also a fantastic way to provide user control of your devices. It’s actually quite easy to add your own commands, and that’s what I’m writing about today!
Back in May we showed how to provision devices by adding Golioth encryption keys using the Zephyr shell. One use case is sending unprovisioned devices to customers, enabling them to connect via USB to add their encryption keys when they first receive the hardware. That system used a custom shell command build into the Golioth SDK as the interface. The same technique can be used to provide run-time interactivity. I recently implemented a serial command interface that let me send commands from Node-RED to a Zephyr device for automated control.
The good news is that all you have to do is turn on the shell (if it’s not already enabled), register your commands with Zephyr, and provide a callback function to react to the user input.
Starting a basic project and turning on the Zephyr shell
The first step is to enable the Zephyr shell using KConfig, and include a header file in your main.c. I’m using a virtual device based on QEMU for today’s example (but this will work with any Zephyr-compatible device that has a serial connection). Golioth has a quickstart guide for using QEMU to simulate devices, which is really handy for testing out new development in isolation from existing projects.
To begin this demo I copied the basic/minimal sample from the Zephyr tree. From there I added a prj.conf file with just one KConfig symbol in it to turn on the shell:
CONFIG_SHELL=y
I also included shell.h in the main.c file:
#include <shell/shell.h>
Creating the custom shell command
I will walk through a very basic custom shell command. The topic goes much deeper and it’s worth reading through the official Zephyr documentation on shell commands.
Inside of main we want to set up the command structure, then register the command. Our demo will set a numeric value for how awesome Golioth is. We also want to be able to read back that value. So I’ll set up two different commands, one that takes a value as an argument.
SHELL_STATIC_SUBCMD_SET_CREATE(
    g_awesome_cmds,
    SHELL_CMD_ARG(set, NULL,
        "set the Golioth awesome level\n"
        "usage:\n"
        "$ golioth_awesome set <awesome_value>\n"
        "example:\n"
        "$ golioth_awesome set 1337\n",
        cmd_g_awesome_set, 2, 0),
    SHELL_CMD_ARG(get, NULL,
        "get the Golioth awesome level\n"
        "usage:\n"
        "$ golioth_awesome get",
        cmd_g_awesome_get, 1, 0),
    SHELL_SUBCMD_SET_END
    );

SHELL_CMD_REGISTER(golioth_awesome, &g_awesome_cmds, "Set Golioth Awesomeness", NULL);
The SHELL_STATIC_SUBCMD_SET_CREATEdefines our command structure and I’ve given it an arbitrary symbol name (g_awesome_cmds)as an identifier.
The next two commands are established using the SHELL_CMD_ARG. Let’s walk through the arguments for that macro:
- The first argument is the subcommand
setorget(note these are not strings) - The second argument is for subcommands of these subcommands, which are needed for this example
- The third argument is the help string to show in the shell
- The fourth argument is the callback function the shell will execute
- The fifth and six arguments are the number of required and optional arguments. Note that we need 2 required arguments for
setin order to capture the submitted value, but only one forget(the subcommand itself).
Finally, I need to register the shell command. The SHELL_CMD_REGISTERtakes a series of arguments. First is the command itself (note that this is not a string), the address of the subcommand structure, the help text for this command, and a function handler which we don’t need since we’re using callback functions defined in the subcommand macro.
A custom shell command in action
We’re not quite done coding yet as we need to make the callback functions. See the bottom of this post for the complete code. But let’s skip right to the demo since the meat of the work has already been done.
uart:~$ help
Please press the <Tab> button to see all available commands.
You can also use the <Tab> button to prompt or auto-complete all commands or its subcommands.
You can try to call commands with <-h> or <--help> parameter for more information.

Shell supports following meta-keys:
  Ctrl + (a key from: abcdefklnpuw)
  Alt  + (a key from: bf)
Please refer to shell documentation for more details.

Available commands:
  clear            :Clear screen.
  device           :Device commands
  devmem           :Read/write physical memory"devmem address [width [value]]
  golioth_awesome  :Set Golioth Awesomeness
  help             :Prints the help message.
  history          :Command history.
  kernel           :Kernel commands
  resize           :Console gets terminal screen size or assumes default in case
                    the readout fails. It must be executed after each terminal
                    width change to ensure correct text display.
  shell            :Useful, not Unix-like shell commands.
uart:~$
The readout above shows that typing help lists our new command in the menu.
uart:~$ golioth_awesome --help
golioth_awesome - Set Golioth Awesomeness
Subcommands:
  set  :set the Golioth awesome level
        usage:
        $ golioth_awesome set <awesome_value>
        example:
        $ golioth_awesome set 1337

  get  :get the Golioth awesome level
        usage:
$ golioth_awesome get
uart:~$
If we call our custom golioth_awesome --help command, the help strings we specified are displayed.
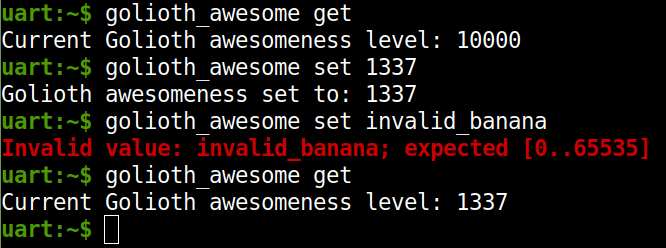
And finally, using the commands shows the expected output. I’ve embedded an image of my terminal so that you can see the different styles of output. This printout is the result of calling `shell_fprintf()` in my callback functions. We haven’t covered that yet, so let’s look at the whole main.c file next.
Putting it all together
The final piece of the puzzle is to define the callback functions for custom shell commands. These functions interact with the Zephyr app on your device, and are responsible for printing messages in the Zephyr shell as feedback for the user.
#include <zephyr/zephyr.h>
#include <stdlib.h>

#include <shell/shell.h>

uint16_t golioth_awesome = 10000;

static int cmd_g_awesome_set(const struct shell *shell, size_t argc,
                char *argv[])
{
    /* Received value is a string so do some test to convert and validate it */
    int32_t desired_awesomeness = -1;
    if ((strlen(argv[1]) == 1) && (argv[1][0] == '0')) {
        desired_awesomeness = 0;
    }
    else {
        desired_awesomeness = strtol(argv[1], NULL, 10);
        if (desired_awesomeness == 0) {
            //There was no number at the beginning of the string
            desired_awesomeness = -1;
        }
    }

    /* Reject invalid values */
    if ((desired_awesomeness < 0) || (desired_awesomeness > 65535)) {
        shell_fprintf(shell, SHELL_ERROR, "Invalid value: %s; expected [0..65535]\n", argv[1]);
        return -1;
    }
    /* Otherwise set and report to the user with a shell message */
    else {
        golioth_awesome = (uint16_t)desired_awesomeness;
        shell_fprintf(shell, SHELL_NORMAL, "Golioth awesomeness set to: %d\n", desired_awesomeness);
    }

    return 0;
}

static int cmd_g_awesome_get(const struct shell *shell, size_t argc,
                char *argv[])
{
    shell_fprintf(shell, SHELL_NORMAL, "Current Golioth awesomeness level: %d\n", golioth_awesome);
    return 0;
}

void main(void)
{
    SHELL_STATIC_SUBCMD_SET_CREATE(
        g_awesome_cmds,
        SHELL_CMD_ARG(set, NULL,
            "set the Golioth awesome level\n"
            "usage:\n"
            "$ golioth_awesome set <awesome_value>\n"
            "example:\n"
            "$ golioth_awesome set 1337\n",
            cmd_g_awesome_set, 2, 0),
        SHELL_CMD_ARG(get, NULL,
            "get the Golioth awesome level\n"
            "usage:\n"
            "$ golioth_awesome get",
            cmd_g_awesome_get, 1, 0),
        SHELL_SUBCMD_SET_END
        );

    SHELL_CMD_REGISTER(golioth_awesome, &g_awesome_cmds, "Set Golioth Awesomeness", NULL);
}
The callback functions begin on line 8 and 38 of the example above. The cmd_g_awesome_set function looks more complicated than it is. That’s because the value we receive from the shell is a string and needs to be converted to an integer and then validated (confirm it is actually a number, and inside the acceptable bounds).
The thing to focus on are the shell_fprintf() functions which use some constants to select the text decoration. SHELL_NORMAL is used when everything is working correctly, and SHELL_ERROR for out-of-bounds settings. You can see all constants that work for this, as well as the shorthand functions for them, in the official docs.
The utility of custom shell commands
So fare I’ve focused on shell interaction with a human user. But once this is in place, you can leverage it programmatically as well. In Linux, I can set our Golioth value from the command line: echo "golioth_awesome set 10000" > /dev/ttyUSB0.
You can also extrapolate this feature from set/get to a much more robust tool. For instance, I covered the built-in Zephyr i2c and sensor shells in a previous post. These facilitate runtime changes to the menu (what sensors and devices are available changes without needing to compile for that information). This should get your mind running on how deep you can go with a custom shell tool to fit your needs. But that’s a topic for next time!
