There is no substitute for testing firmware on real target hardware, but manual testing is both error prone and time consuming. Today, I’ll walk you through the process of using pytest to automate your hardware testing. There are three main building blocks to this approach
1. Compile the firmware you want to test
2. Use a pytest fixture to program the firmware onto the device and monitor the output
3. Run the tests to verify the device output
Pytest is a framework for — you guessed it — testing! When working with embedded hardware you need to spend some time setting up fixtures that connect it to pytest. Once that’s in place, you’ll be surprised at how fast you can write tests for your firmware projects. Let’s dive in.
This approach works for any firmware platform
In today’s example, the only platform-specific portion is a program() function that needs to know the commands used to flash firmware on your device. But this is easy to adapt for any platform. At Golioth we take advantage of this since the Golioth Firmware SDK tests hardware on two different RTOSes, using silicon from a handful of different vendors.
For this post I’m targeting a Nordic nRF52840 using Zephyr. However, it depends purely on pytest and is not using Twister (Zephyr’s dedicated test running application). We do use Twister on our Zephyr sample testing, but those are only a portion of our hardware-in-the-loop tests. We’ll publish a separate post detailing that process in the future.
Today’s demo involves adding a subfolder to your firmware project named pytest, and creating two file inside:
- pytest/conftest.py
- pytest/test_hello_world.py
A code walk-through follows, with the full source available as a gist.
Step 1: Compile your firmware
We’ll be testing firmware by monitoring output from a serial connection. Let’s start with a “Hello World” application. The hello_world sample in the Zephyr tree simply prints out “Hello World! <name of your board>” which is perfect for this demonstration.
west build -b nrf52840dk_nrf52840 . -p
The above build command generates a binary at build/zephyr/zephyr.hex. We do not need to flash it to the device, we’ll use a pytest function for this.
Step 2: Write a pytest fixture for this board
In this section we’ll populate a conftest.py file that can be reused by multiple tests.
Install dependencies
Make sure you have Python installed and then use pip to install the libraries needed for this project. We’ll be using the AnyIO and Trio libraries for asynchronous support, and Python will need access to the serial port. We also want a Python library for programming the target chip:
pip install pytest anyio trio pyserial

# This one is used to program Nordic devices
pip install pynrfjprog
Now add the necessary imports to the top of your conftest.py file:
import pytest
import re
import serial
from time import time

# Used to flash binary to nrf52840dk
from pynrfjprog import LowLevel

import pytest
import re
import serial
from time import time

# Used to flash binary to nrf52840dk
from pynrfjprog import LowLevel

@pytest.fixture(scope='session')
def anyio_backend():
    return 'trio'
The final block is a special pytest fixture that tells AnyIO to use the Trio backend.
Setting up command line arguments
While not strictly necessary for a one-off test, adding command line arguments makes your test easier to run using continuous integration (CI) tools like GitHub Actions.
def pytest_addoption(parser):
    parser.addoption("--port",
            help="The port to which the device is attached (eg: /dev/ttyACM0)")
    parser.addoption("--baud", type=int, default=115200,
            help="Serial port baud rate (default: 115200)")
    parser.addoption("--fw-image", type=str,
            help="Firmware binary to program to device")
    parser.addoption("--serial-number", type=str,
            help="Serial number to identify on-board debugger")

@pytest.fixture(scope="session")
def port(request):
    return request.config.getoption("--port")

@pytest.fixture(scope="session")
def baud(request):
    return request.config.getoption("--baud")

@pytest.fixture(scope="session")
def fw_image(request):
    return request.config.getoption("--fw-image")

@pytest.fixture(scope="session")
def serial_number(request):
    return request.config.getoption("--serial-number")
Above we’ve used a special pytest_addoption() function to add command line flags for port, baud, firmware filename, and programmer serial number. A fixture is added to return each of these so they are available to other fixtures (and in the tests themselves).
Create a class for your board
We want to create a class to represent the device under test. Golioth has an entire directory full of board class definitions for different vendors which we use in our automated testing. For this example we really just need a way to program the board and monitor its serial output.
class Board():
    def __init__(self, port, baud, fw_image, serial_number):
        self.port = port
        self.baud = baud
        self.fw_image = fw_image
        self.serial_number = serial_number

        #program firmware
        self.program(fw_image)

        self.serial_device = serial.Serial(port, self.baud, timeout=1, write_timeout=1)

    def program(self, fw_image):
        with LowLevel.API() as api:
            api.connect_to_emu_with_snr(int(self.serial_number))
            api.erase_all()
            api.program_file(self.fw_image)
            api.sys_reset()
            api.go()
            api.close()

    def wait_for_regex_in_line(self, regex, timeout_s=20, log=True):
        start_time = time()
        while True:
            self.serial_device.timeout=timeout_s
            line = self.serial_device.read_until().decode('utf-8', errors='replace').replace("\r\n", "")
            if line != "" and log:
                print(line)
            if time() - start_time > timeout_s:
                raise RuntimeError('Timeout')
            regex_search = re.search(regex, line)
            if regex_search:
                return regex_search
The Board class implements a program() function specific to flashing firmware onto this device. You will want to replace this function for your own target hardware. Note that when this is instantiated, the init() function will call the program() function, flashing the firmware onto the board at the start of the test suite.
The Board class also implements a wait_for_regex_in_line() function that is a fancy way to match lines printed in the serial terminal. This should be transferable to any board that prints to serial (in our case, via a USB connection). This function includes a timeout feature, which means your test will not wait forever when a device is misbehaving.
@pytest.fixture(scope="session")
def board(port, baud, fw_image, serial_number):
    return Board(port, baud, fw_image, serial_number)
The final piece of the puzzle is a fixture that makes the Board available to your test. The session scope ensures that your board will only be instantiated once per test-run.
Step 3: Write your tests
The hard work is behind us, this step is simple by comparison. Create a file prefixed with the word “test” to host your tests. We’ll call this test_hello_world.py.
import pytest

pytestmark = pytest.mark.anyio

async def test_hello(board):
    board.wait_for_regex_in_line("Hello World");
We begin by importing pytest, then using the special pytestmark directive to indicate we want to use AnyIO for asynchronous functions. Each function that is declared with the test_ prefix in the function name will be automatically run by pytest and individually reported with a pass/fail.
Notice in this case that we are using a regex to match “Hello World” even though the full message received will be “Hello World! nrf52840dk_nrf52840”.
Running the test
Let’s run this test, remembering to supply the necessary arguments for the board programming and serial output to work:
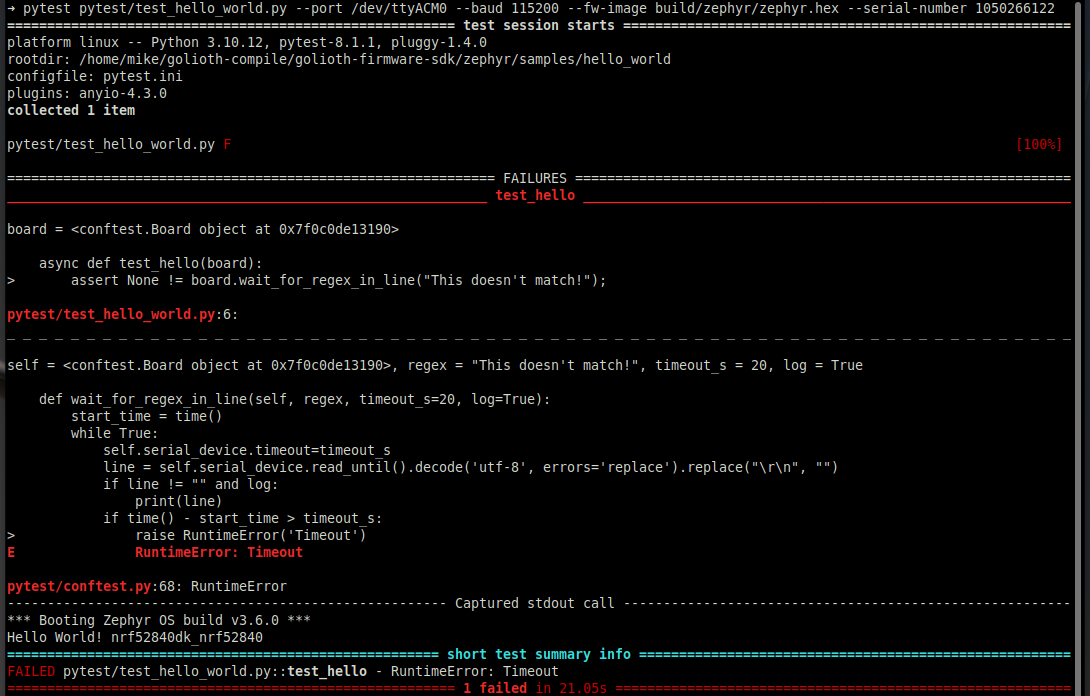
➜ pytest pytest/test_hello_world.py --port /dev/ttyACM0 --baud 115200 --fw-image build/zephyr/zephyr.hex --serial-number 1050266122
Pytest includes colorful output with a summary of the tests:

You don’t get a lot of output for a successful test. But if you change the matched test to something that is not expected, we should get a timeout error. You can see that warnings and errors cause more information to be printed. Note the angle bracket that indicates the assert that caused the failure. The error message is printed further down in red, followed by the actual output received from the board:
While this example includes just a single test that watches for output, you can grow this to many tests that interact with the board. For instance, the Golioth RPC service tests implement about a dozen tests that prompt the target board to react by sending remote procedure calls from the Golioth cloud via our REST API, verifying the output from each.
Automating the tests
We have already automated this hello_world test. But we’re still running it manually on the command line. You can use GitHub self-hosted runners to connect your own devices to GitHub Actions for true automation.
Golioth has built extensive hardware-in-the-loop automation that does just this. You can check out our workflows to get a better picture of how this works. The step that calls pytest should include syntax you recognize, pointing to the test file and passing the configuration in as command line arguments:
- name: Run test
  shell: bash
  env:
    hil_board: ${{ inputs.hil_board }}
  run: |
    source /opt/credentials/runner_env.sh
    PORT_VAR=CI_${hil_board^^}_PORT
    SNR_VAR=CI_${hil_board^^}_SNR
    for test in `ls tests/hil/tests`
    do
      pytest --rootdir . tests/hil/tests/$test                            \
        --board ${hil_board}                                              \
        --port ${!PORT_VAR}                                               \
        --fw-image ${test}-${{ inputs.binary_name }}                      \
        --serial-number ${!SNR_VAR}                                       \
        --api-url ${{ inputs.api-url }}                                   \
        --api-key ${{ secrets[inputs.api-key-id] }}                       \
        --wifi-ssid ${{ secrets[format('{0}_WIFI_SSID', runner.name)] }}  \
        --wifi-psk ${{ secrets[format('{0}_WIFI_PSK', runner.name)] }}    \
        --mask-secrets                                                    \
        --timeout=600
    done
Resources

No comments yet! Start the discussion at forum.golioth.io