Here’s a scenario that might sound familiar.
You’ve added a new feature to the firmware, about 800 lines of code, along with some simple unit tests. All unit tests are passing. The code coverage report is higher than ever. You pat yourself on the back for a job well done.
But then – for a brief moment, conviction wavers as a voice in your head whispers: “The mocks aren’t real”; “Does this code really work?”; “You forgot to test OTA.”
But the moment passes, and your faith is restored as you admire the elegant green CI check mark ✅.
Do you trust your unit tests enough to deploy the firmware right now to thousands of real devices via Over-the-Air (OTA) firmware update?
If the answer is “well, no, not really, we still need to test a few things with the real hardware”, then automated Hardware-in-the-Loop (HIL) testing might give you the confidence to upgrade that answer to “heck yeah, let’s ship it!”. 🚀
In this post, I’ll explain what HIL testing is, and why we use it at Golioth to continuously verify the firmware for our Zephyr and ESP-IDF SDKs.
HIL Testing: A Definition
If you search online, you’ll find a lot of definitions of what HIL testing is, but I’ll try to formulate it in my own simple terms.
There are three major types of tests:
- Unit – the smallest kind of test, often covering just one function in isolation
- Integration – testing multiple functions or multiple subsystems together
- System – testing the entire system, fully integrated
A firmware test can run in three places:
- On your host machine – Running a binary compiled for your system
- On emulated target hardware – Something like QEMU or Renode
- On real target hardware – Running cross-compiled code for the target, like an ARM or RISC-V processor.
A HIL test is a system test that runs on real target hardware, with real peripherals, and real connections. Typically, a HIL setup will consist of:
- A board running your firmware (the code under test)
- A host test machine, executing the tests
- (optional) Other peripherals and test equipment to simulate real-world conditions, controlled by the host test machine
Coverage and Confidence
Why bother with HIL tests? Aren’t unit tests good enough?
To address this, I’ll introduce two terms:
- Coverage: How much of the firmware is covered by tests?
- Confidence: How confident are you that the firmware behaves as intended?
Coverage is easily measured by utilizing open-source tools like gcov. It’s an essential part of any test strategy. Confidence is not as easily measured. It’s often a gut feeling.
It’s possible to have 100% coverage and 0% confidence. You can write tests that technically execute every line of code and branch combination without testing any intended functionality. Similarly, you can have 0% coverage and 100% confidence, but if you encounter someone like this, they are, to put it bluntly, delusional.
Unit tests are great at increasing coverage. The code under test is isolated from the rest of the system, and you can get into all the dark corners. “Mocks” are used to represent adjacent parts of the system, usually in a simplistic way. This might be a small piece of code that simulates the response over a UART. But this means is you can’t be 100% confident the code will work the same way in the context of the full system.
HIL system tests are great at increasing confidence, as they demonstrate that the code is functional in the real world. However, testing things at this level makes it difficult to cover the dark corners of code. The test is limited to the external interfaces of the system (ie. the UART you had a mock for in the above example).
A test strategy involving both unit tests and HIL tests will give you high coverage and high confidence.
Continuously Verifying Golioth SDK Firmware
Why do we use HIL testing at Golioth?
We have the concept of Continuously Verified Boards, which are boards that get first-class support from us. We test these boards on every SDK release across all Golioth services.
Previously, these boards were manually tested each release, but there were several problems we encountered:
- It was time-consuming
- It was error-prone
- It did not scale well as we added boards
- OTA testing was difficult, with lots of clicking and manual steps involved
- The SDK release process was painful
- We were unsure whether there had been regressions between releases
We’ve alleviated all of these problems by introducing HIL tests that automatically run in pull requests and merges to the main branch. These are integrated into GitHub Actions (Continuous Integration, CI), and the HIL tests must pass for new code to merge to main.
Here’s the output of the HIL test running in CI on a commit that merged to main recently in the ESP-IDF SDK:
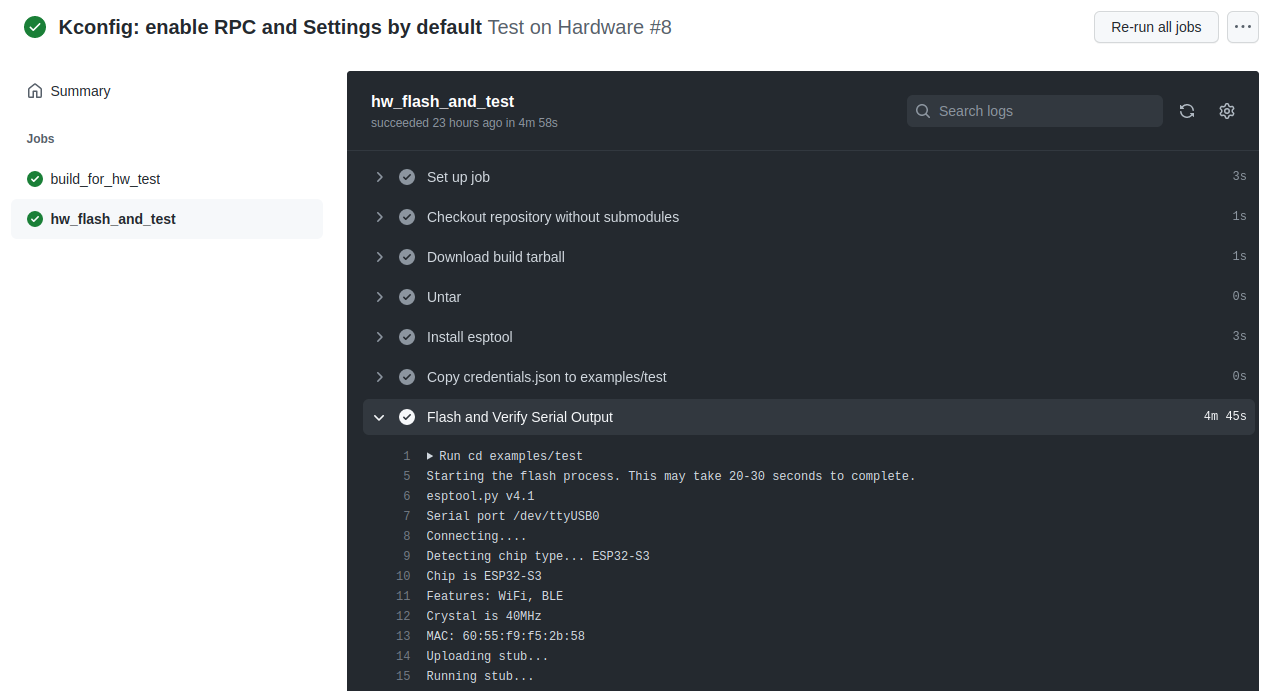
This is just the first part of the test where the ESP32 firmware is being flashed.
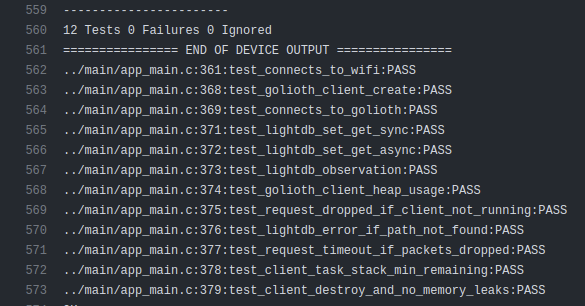
Further down in the test, you can see we’re running unit tests on hardware:
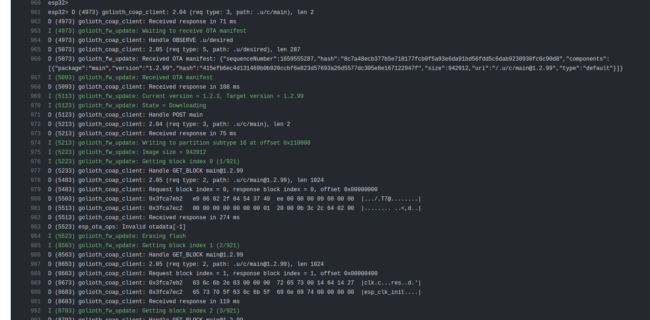
And we even have an automated OTA test:
As a developer of this firmware, I can tell you that I sleep much better at night knowing that these tests pass on the real hardware. In IoT devices, OTA firmware update is one of the most important features to get right (if not the most important), so testing it automatically has been a big win for us.
HIL on a Budget
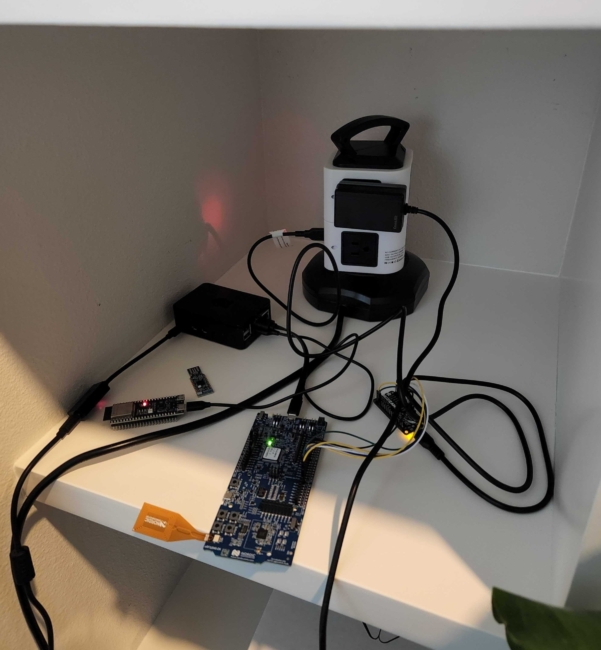
Designing a prototype HIL system does not need to be a huge up-front investment.
At Golioth, one engineer was able to build a prototype HIL within one week, due primarily to our simple hardware configuration (each tested board just needs power, serial, and WiFi connection) and GitHub Actions Self-Hosted Runners, which completely solves the infrastructure and DevOps part of the HIL system.
The prototype design looks something like this:
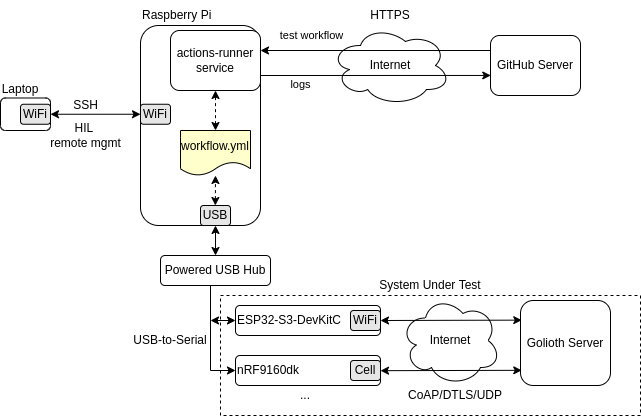
I’m using my personal Raspberry Pi as the self-hosted runner. GitHub makes it easy to register any kind of computer (Linux, MacOS, or Windows) as a self-hosted runner.
And here’s a pic of my HIL setup, tucked away in a corner and rarely touched or thought about:
Next Time
That’s it for part 1! We’ve covered the “why” of HIL testing at Golioth and a little bit of the “how”.
In the next part, we’ll dive deeper into the steps we took to create the prototype HIL system, the software involved, and some of the lessons learned along the way.
Thanks to Michael for the photo of Tiger and Turtle

No comments yet! Start the discussion at forum.golioth.io