The most sought-after Golioth feature is OTA, also known as Over-the-Air firmware updates. When you put an IoT device into the field it’s crucial that you be able to push firmware updates to it without human intervention. Golioth makes simplifies the process for your ESP-IDF projects.
Today we’re walking through the OTA process:
- Build and flash the initial firmware to the device
- Provision the device with credentials that will be persistent across firmware updates
- Build a new revision of the firmware
- Upload the firmware to Golioth and roll it out as a release
- Observe the device detecting, downloading, and running the new firmware
Prerequisites:
Please ensure that you have installed a copy of the the ESP-IDF v4.4.2 to your computer. Today’s article will use an ESP32 but this will work with other variants like the ESP32s2, ESP32c3, etc.
Clone a copy of the Golioth Firmware SDK (which includes ESP-IDF support). To do, please follow the “Cloning this repo section” in the README.
Commands in this guide are based on a Linux operating system with the ESP-IDF and Golioth Firmware SDK installed in the home directory (~/). However, these are cross-platform tools and are easy to adapt to your system and your preferred install directories.
Build and flash the initial firmware
In a classic Chicken-or-Egg scenario, to perform a Golioth OTA update your device needs to be running firmware built for Golioth OTA. We can use the golioth_basics example which is ready to run without changes.
First, let’s make sure our ESP-IDF is set to the correct version and enabled for this session:
cd ~/esp-idf
git fetch
git checkout v4.4.2
git submodule update --init --recursive ./install.sh all
source export.sh
Now move to the ESP-IDF section of the Golioth Firmware SDK, specifically the golioth_basics example. We’ll build, flash, and run this code on the ESP32:
cd ~/golioth-firmware-sdk/examples/esp_idf/golioth_basics
idf.py build
idf.py flash
idf.py monitor
On some systems you will need to hold the boot button on the ESP32 in order to flash the code. I find to get the monitor command to work I need to first hold the boot button, then press reset when the screen says “waiting for download”. One last tip: CTRL-] is used to exit from the idf.py monitor screen.
Assign device credentials and connect
There are a number of ways to assign credentials to your device (including Bluetooth via your browser!) but perhaps the easiest is to type them into the shell. Head over to the Golioth Console and select your device’s credentials tab. (If you don’t have an account, sign up for the Dev Tier now, your first 50 devices are free.)
Use your the shell window to set the credentials. Here you can see the process, with the four commands for Golioth and WiFi credentials highlighted:
Type 'help' to get the list of commands.
Use UP/DOWN arrows to navigate through command history.
Press TAB when typing command name to auto-complete.
esp32> W (2212) golioth_example: WiFi and golioth credentials are not set
W (2212) golioth_example: Use the shell settings commands to set them, then restart
esp32>
esp32> settings set golioth/psk-id 20221122201152-esp32@developer-training
Setting golioth/psk-id saved
esp32> settings set golioth/psk 5bfb64ad29dce4e3dd30ab10c5b95a6a
Setting golioth/psk saved
esp32> settings set wifi/ssid MyWifiAp
Setting wifi/ssid saved
esp32> settings set wifi/psk MyWifiPassword
Setting wifi/psk saved
esp32> reset
The final command resets the device so that it will use the new credentials. You should see this output:
I (4235) esp_netif_handlers: sta ip: 192.168.1.159, mask: 255.255.255.0, gw: 192.168.1.1
I (4235) example_wifi: WiFi Connected. Got IP:192.168.1.159
I (4235) example_wifi: Connected to AP SSID: MyWifiAp
I (4255) golioth_mbox: Mbox created, bufsize: 2184, num_items: 20, item_size: 104
I (4255) golioth_basics: Waiting for connection to Golioth...
W (4295) wifi:<ba-add>idx:0 (ifx:0, c6:ff:d4:a8:fa:10), tid:0, ssn:1, winSize:64
I (4395) golioth_coap_client: Start CoAP session with host: coaps://coap.golioth.io
I (4405) libcoap: Setting PSK key

I (4415) golioth_coap_client: Entering CoAP I/O loop
I (4805) golioth_basics: Golioth client connected
I (4805) golioth_basics: Hello, Golioth!
I (4815) golioth_coap_client: Golioth CoAP client connected
I (4815) golioth_fw_update: Current firmware version: 1.2.5
I (5735) golioth_fw_update: Waiting to receive OTA manifest
I (5835) golioth_basics: Synchronously got my_int = 42
I (5845) golioth_basics: Entering endless loop
I (5845) golioth_basics: Sending hello! 0
I (5935) golioth_fw_update: Received OTA manifest
I (5935) golioth_fw_update: Manifest does not contain different firmware version. Nothing to do.
I (5945) golioth_fw_update: Waiting to receive OTA manifest
I (6545) golioth_basics: Callback got my_int = 42
W (9805) golioth_coap_client: CoAP message retransmitted
W (10335) golioth_coap_client: 4.00 (req type: 3, path: .c/status), len 59
I (15845) golioth_basics: Sending hello! 1
I (21965) wifi:bcn_timout,ap_probe_send_start
I (25855) golioth_basics: Sending hello! 2
I (35005) wifi:bcn_timout,ap_probe_send_start
I (35855) golioth_basics: Sending hello! 3
First the ESP32 connects to WiFi, then Golioth. After checking (and not finding) a firmware update available, this example begins sending hello messages every few seconds.
Now let’s do an OTA firmware update
We connected to Golioth with the device, now let’s build and upload a new firmware package to test the OTA capabilities. We’ll use the same code, updating the Current Version number which the device uses to identify when an update is needed. We’ll also change the string used in the log messages so it’s easy to recognize that our new firmware is running.
Change the source code version and rebuild
The file we need to update is a common file used by multiple Golioth SDKs. Edit the ~/golioth-firmware-sdk/examples/common/golioth_basics.c file:
#define TAG "golioth_basics_new"

// Current firmware version
static const char* _current_version = "1.2.6";
You can see I’ve appended “_new” to the tag name and incremented the version number to 1.2.6. Now we’re ready to rebuild… but remember, don’t flash this to your ESP32. We’re going to upload it to Golioth and perform a remote firmware update!
cd ~/golioth-firmware-sdk/examples/esp_idf/golioth_basics
idf.py build
The newly built binary is located in the build folder.
Upload firmware to Golioth and roll out a release
After much preamble we’ve arrived at the important moment.
To set the scene, the ESP32 that’s running on your desk is a remote IoT device taking sensor readings in a brick-and-mortar retail establishment in Waldorf, Maryland. We’ll push an update to it using a three-step process:
- Upload the binary as an “artifact”
- Create a “release” using the artifact
- Click the “rollout” button to make the release live
Go to the Golioth Console and select Firmware Update→Artifacts from the left sidebar. Click the “Create” button.
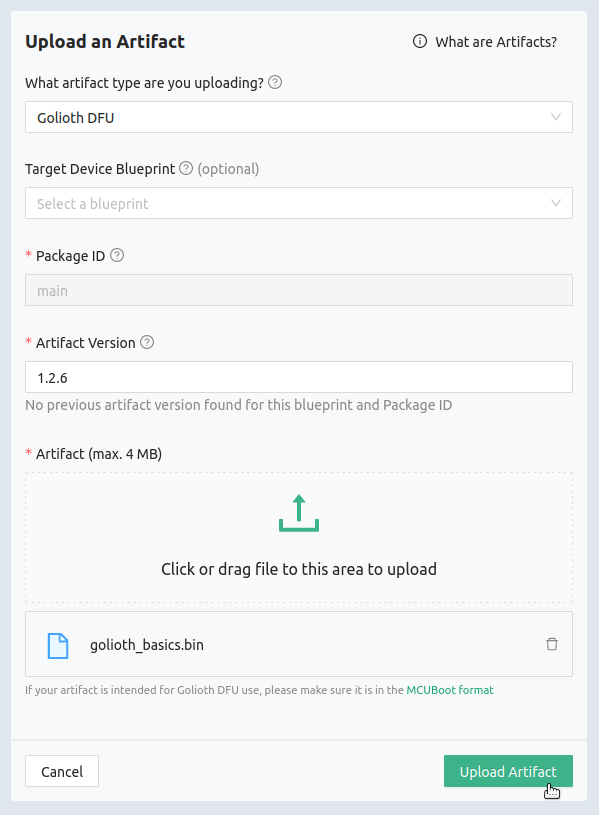
The only thing we’re going to change on this window is the “Artifact Version”. Type in the same version number you entered in the sourcecode for this firmware (probably 1.2.6 if you’re following along). Click the upload icon in the middle of the window and choose the “golioth_basics.bin” file from the build directory where you ran the idf.py build command. Finally, click the Upload Artifact button.
Now let’s create a release based on the artifact. Click Firmware Update→Release from the left sidebar and click the Create button.
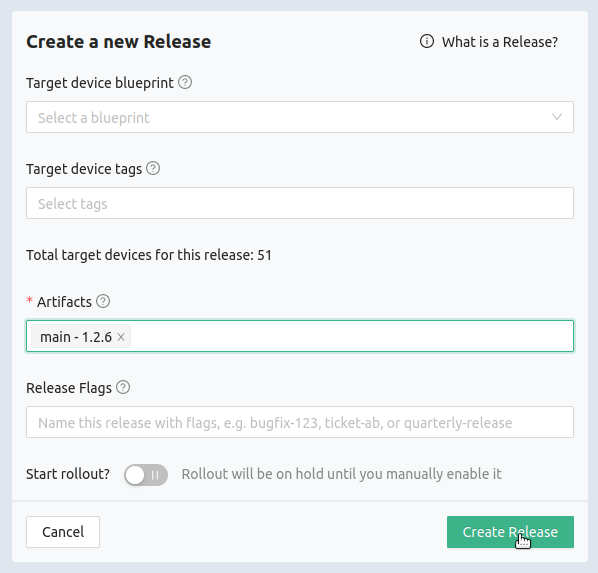
All we’re going to do here is to chose the artifact we previously created in the Artifacts box and press Create Release.
You have some options here, most notably you can choose to start the rollout as soon as the release is created. I prefer to wait and roll it out as a separate confirmation step in case I made some mistake along the way.
Note that you have the option here of selecting device Blueprints and Tags to make this a more targeted release. This window is telling me the release will apply to 51 devices (!). That’s okay here because these are all test devices on a test project that we use for training.
Finally, let’s roll out the release to our devices:
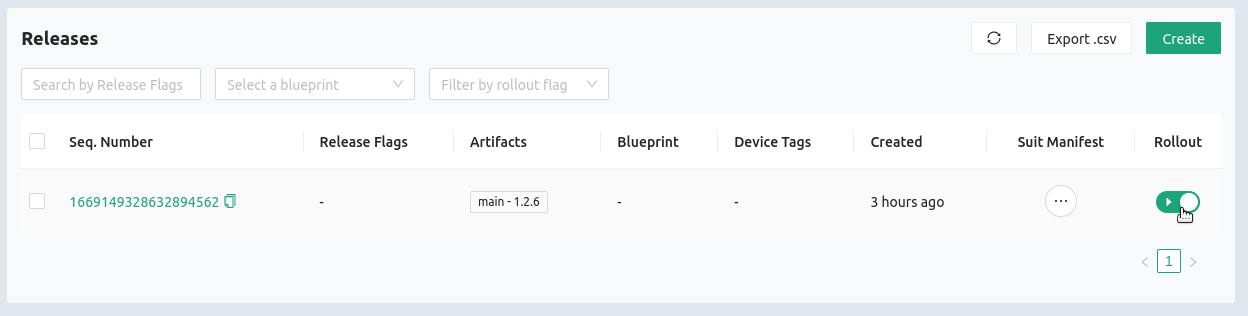
The Rollout button is all that stand between you and automatic updates. Click it and you will (almost) immediately see your device begin to download the new binary.
Here’s an awesome feature to keep in mind. When you have more than one release, you can use this button to rollback to previous versions. This means if you realize you released an update that has a bug, you can just toggle this button and all of your devices will automatically download the next-newest release that has rollout selected.
Watch your ESP32 update
If you read the source code for the golioth_basics example you will notice that it calls golioth_fw_update_init(client, _current_version);. That means the device has registered with the Golioth servers to receive updates when new firmware is available. Look in the terminal output and you will see the result:
I (175827) golioth_basics: Sending hello! 17
I (185007) golioth_fw_update: Received OTA manifest
I (185007) golioth_fw_update: Current version = 1.2.5, Target version = 1.2.6
I (185017) golioth_fw_update: State = Downloading
I (185317) golioth_fw_update: Image size = 1211744
I (185327) golioth_fw_update: Getting block index 0 (1/1184)
I (185827) golioth_basics: Sending hello! 18
W (187867) golioth_coap_client: CoAP message retransmitted
I (187947) fw_update_esp_idf: Writing to partition subtype 17 at offset 0x1a0000
I (187947) fw_update_esp_idf: Erasing flash
I (191627) golioth_fw_update: Getting block index 1 (2/1184)
I (191837) golioth_fw_update: Getting block index 2 (3/1184)
I (192037) golioth_fw_update: Getting block index 3 (4/1184)
I (192187) golioth_fw_update: Getting block index 4 (5/1184)
I (192447) golioth_fw_update: Getting block index 5 (6/1184)
I (192597) golioth_fw_update: Getting block index 6 (7/1184)

... snip ...

I (279837) golioth_fw_update: Getting block index 1181 (1182/1184)
I (280107) golioth_fw_update: Getting block index 1182 (1183/1184)
I (280317) golioth_fw_update: Getting block index 1183 (1184/1184)
I (280457) golioth_fw_update: Total bytes written: 1211760
I (280467) esp_image: segment 0: paddr=001a0020 vaddr=3f400020 size=29df0h (171504) map
I (280527) esp_image: segment 1: paddr=001c9e18 vaddr=3ffbdb60 size=05868h ( 22632)
I (280537) esp_image: segment 2: paddr=001cf688 vaddr=40080000 size=00990h ( 2448)
I (280547) esp_image: segment 3: paddr=001d0020 vaddr=400d0020 size=d9a64h (891492) map
I (280847) esp_image: segment 4: paddr=002a9a8c vaddr=40080990 size=1e2a0h (123552)
I (280887) esp_image: segment 5: paddr=002c7d34 vaddr=50000000 size=00010h ( 16)
I (280887) golioth_fw_update: State = Downloaded
I (281127) golioth_fw_update: State = Updating
I (281327) fw_update_esp_idf: Setting boot partition
I (281337) esp_image: segment 0: paddr=001a0020 vaddr=3f400020 size=29df0h (171504) map
I (281397) esp_image: segment 1: paddr=001c9e18 vaddr=3ffbdb60 size=05868h ( 22632)
I (281417) esp_image: segment 2: paddr=001cf688 vaddr=40080000 size=00990h ( 2448)
I (281417) esp_image: segment 3: paddr=001d0020 vaddr=400d0020 size=d9a64h (891492) map
I (281717) esp_image: segment 4: paddr=002a9a8c vaddr=40080990 size=1e2a0h (123552)
I (281757) esp_image: segment 5: paddr=002c7d34 vaddr=50000000 size=00010h ( 16)
I (281827) golioth_fw_update: Rebooting into new image in 5 seconds
I (282827) golioth_fw_update: Rebooting into new image in 4 seconds
I (283827) golioth_fw_update: Rebooting into new image in 3 seconds
I (284827) golioth_fw_update: Rebooting into new image in 2 seconds
I (285827) golioth_fw_update: Rebooting into new image in 1 seconds

... snip ...

I (4267) esp_netif_handlers: sta ip: 192.168.1.159, mask: 255.255.255.0, gw: 192.168.1.1
I (4267) example_wifi: WiFi Connected. Got IP:192.168.1.159
I (4277) example_wifi: Connected to AP SSID: TheNewPeachRepublic
I (4287) golioth_mbox: Mbox created, bufsize: 2184, num_items: 20, item_size: 104
I (4287) golioth_basics_new: Waiting for connection to Golioth...
W (4297) wifi:<ba-add>idx:0 (ifx:0, c6:ff:d4:a8:fa:10), tid:0, ssn:1, winSize:64
I (4307) golioth_coap_client: Start CoAP session with host: coaps://coap.golioth.io
I (4307) libcoap: Setting PSK key

I (4317) golioth_coap_client: Entering CoAP I/O loop
I (4637) golioth_basics_new: Golioth client connected
I (4647) golioth_coap_client: Golioth CoAP client connected
I (4657) golioth_basics_new: Hello, Golioth!
I (4657) golioth_fw_update: Current firmware version: 1.2.6
I (4657) golioth_fw_update: Waiting for golioth client to connect before cancelling rollback
I (4677) golioth_fw_update: Firmware updated successfully!
I (4727) golioth_fw_update: State = Idle
I (5937) golioth_basics_new: Synchronously got my_int = 42
I (5937) golioth_basics_new: Entering endless loop
I (5937) golioth_basics_new: Sending hello! 0
First, the device compares version numbers and then begins to download blocks of the new firmware. Once downloaded it will reboot, connect to Golioth, and verify that it is running the newest version. The log labels near the end of the output now show golioth_basics_new, confirming one of the changes we made to our source code.

On the Golioth Console, the summary view for this device confirms the currently running firmware version is 1.2.6!
With Golioth, OTA is built into the SDK
Golioth has done the heavy lifting so that you don’t need to. Our SDK uses just the single API call to register your devices for firmware updates. Use the fleet management tools on the Golioth Cloud to provision your devices in groups and by hardware variants. These make it possible to target your test devices for the first round of updates, or push new features just to the devices on the fourth floor of your Des Moines plant.
These robust tools are crucial for successful, long-lasting IoT deployments, and and they’re ready for you to start using right now. If you have any questions, we’d love to talk! Reach out to us on the Golioth Forum or get in touch with the DevRel team for demo.

No comments yet! Start the discussion at forum.golioth.io