The Hackaday Superconference returned for the second post-lockdown year. This was actually the seventh “Supercon” and Dan and Mike were on hand to represent Golioth. As badge-hacking is a large part of the social scene at the conference, we spent a fair amount of time getting data from the non-connected badge up to the cloud. What started out as a test-equipment related project ended up as a community art project.
Conference Admission with a Decades-Old Bench Tool
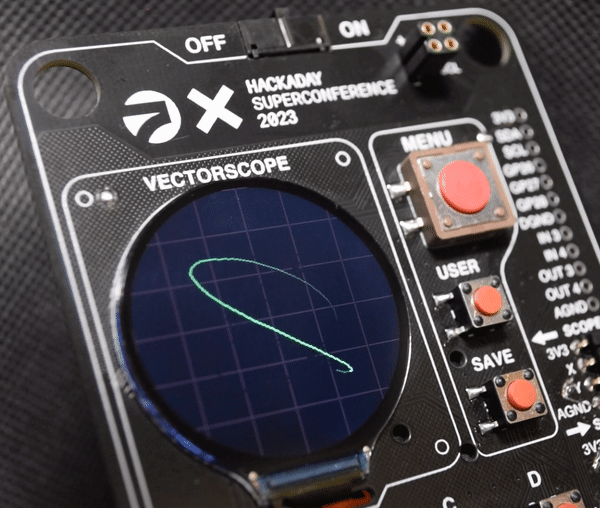
If you read the Golioth blog, chances are you already know about Supercon. But if not, it’s a conference aimed at people building and working with electronic hardware. Fittingly, instead of a printed plastic rectangle on a lanyard, the Supercon badge is itself an electronic device. This year it was modelled after a Vectorscope; a type of oscilloscope that plots two voltage signals along X and Y axes, instead of plotting a signal in the time domain.
We had high ambitions for our badge hack. The original plan was to cache the captured voltages being measured by the badge’s ADCs and send them up to the cloud so they could be replayed later. This was a pretty interesting idea, since every badge has a set of inputs and outputs. We could run custom code on the inputs of our badge and capture data from the unaltered badges of people we ran into. We could potentially catch the vector source by using jumper wires to their output pins.
Alas, the badge creators did a great job of squeezing impressive performance out of the RP2040-based hardware. A tight chain of DMA and PIO (programmable input-output) kept the pipeline of samples out of the processor. We were able to capture some lossy data, and we think we could have tapped into a data stream on the order of 50 ksps, but then RAM becomes an issue to cache that kind of throughput. This meant our original plan was not to be.
Luckily, Dan noticed that a “sketch” app was included on the badge. A static image is simpler to offload to the cloud and render on a gallery page. We had some of the Golioth Aludel-mini hardware with us that uses an nRF9160 cellular modem. So we set off to make it happen.
Badgecase: the Badge Showcase
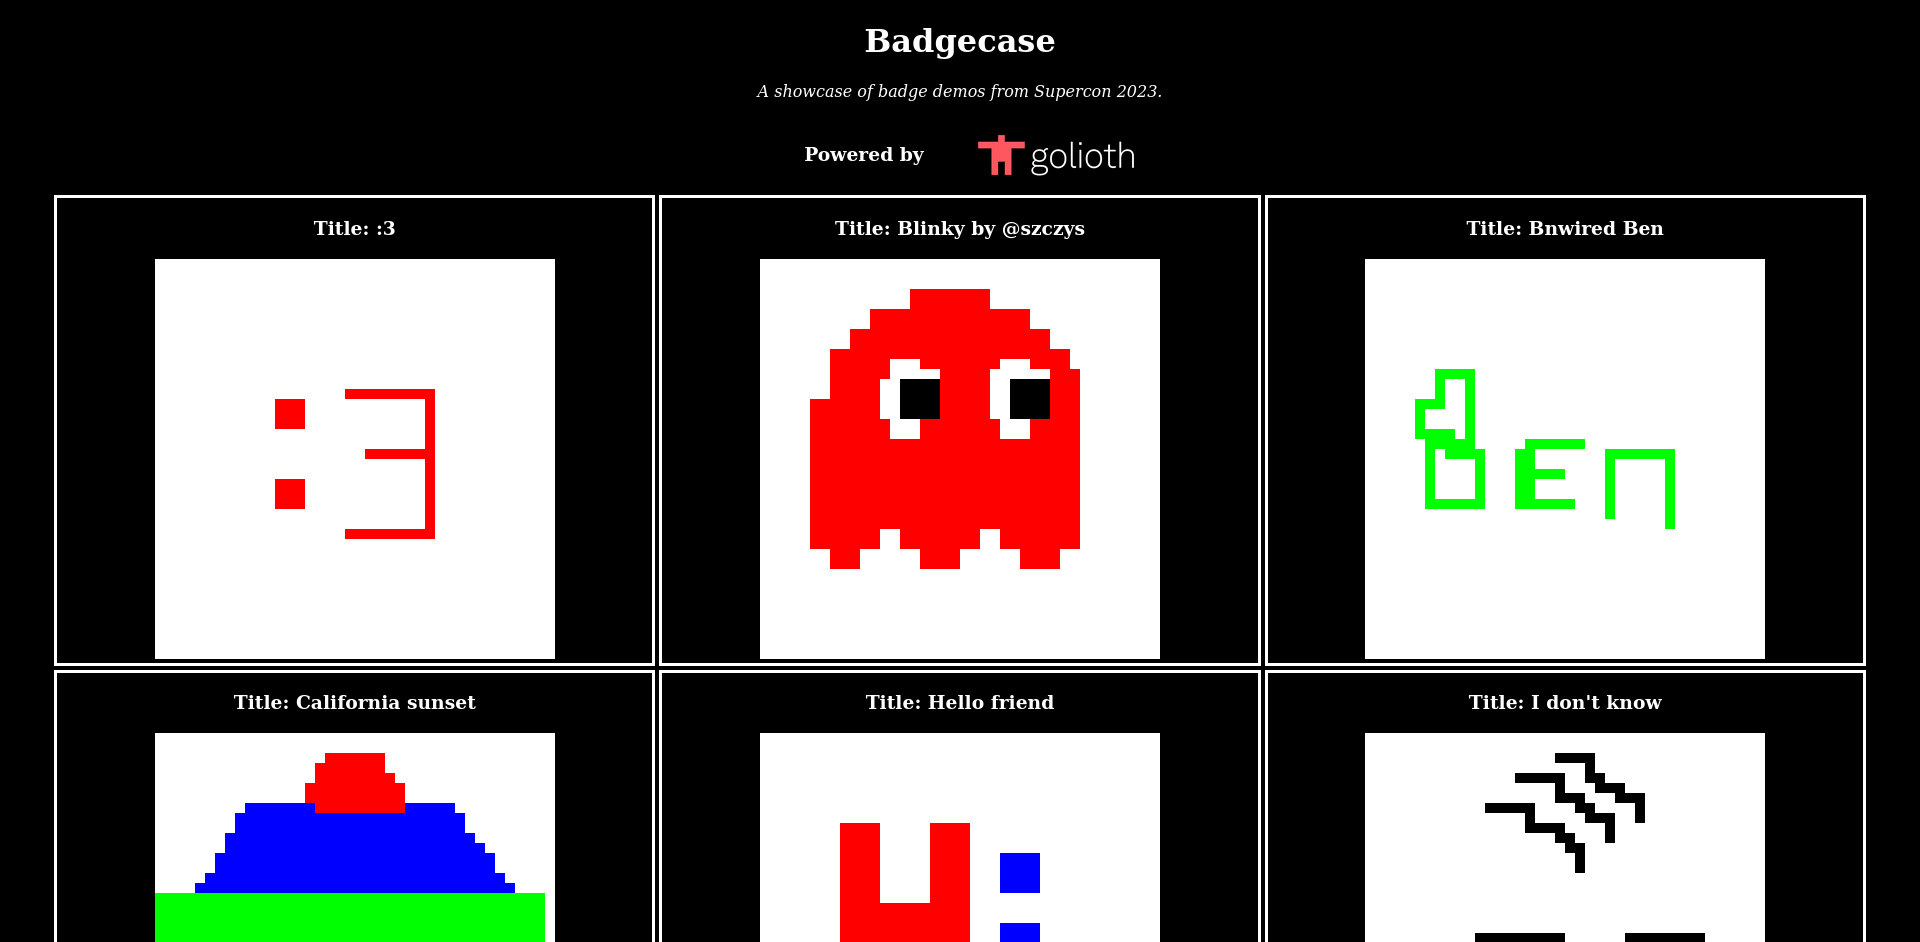
The impatient reader can head over to Badgecase.io and see the results of our badge hacking. All of the art on that page was entered on a conference badge and uploaded over cellular.
The Gist of the Hack
The stock badges run Micropython. We compiled a custom version so that we could implement i2c peripheral mode on the badge using the RP2040 hardware peripheral. This makes it look like a sensor; Golioth is great at harvesting sensor data and sending it to the cloud. We grab the image data (ignoring all white background pixels), sliced it up into i2c packets, then combined those into CBOR packets and upload them to LightDB Stream.
This is where the cloud side of things takes over. A frontend written in Rust uses a Websocket listener to react to incoming packets. It queries the Golioth cloud for the unique ID of each image, collects all of the blocks that shared the same UID, and reassembles them into PNG files. To add a maker’s mark, a Golioth remote procedure call (RPC) was used just prior to upload to add a title/name to each piece of artwork. All is hosted on a dynamic page which we will convert to a static entry for posterity. However, we had enough fun with this that we may do more of these shenanigans using different subdomains in the future, so watch this space.
The Firmware
Alterations to the actual Micropython apps running on the badge were minimal, the majority of the work came in the i2c peripheral functions as they chopped up data into packets and handled incoming requests from the i2c controller.
def encode_point_for_upload(x, y, color):
    x_high = (x << 10) & 0b1111110000000000
    y_mid = (y << 4) & 0b0000001111110000
    coord = x_high | y_mid
    if color == gc9a01.RED:
        coord |= 1
    elif color == gc9a01.GREEN:
        coord |= 2
    elif color == gc9a01.BLUE:
        coord |= 3
    elif color == gc9a01.BLACK:
        coord |= 4
    else:
        coord |= 0

    print(coord >> 8, coord & 0x00FF)
    return (coord & 0x00FF, coord >> 8)

def menu(key):       # exit and return to menu
    ostentus_i2c.fifo_init_samples()
    for i,m in enumerate(model):
        for j,n in enumerate(m):
            if n != gc9a01.WHITE:
                print(i,j,n)
                coord, col = encode_point_for_upload(i, j, n)
                ostentus_i2c.fifo_put_point(coord, col)
    ostentus_i2c.fifo_finalize_samples()

    while(ostentus_i2c.outgoing_data_available()):
        time.sleep(1)


    global stopflag
    print("menu")
    if vos_state.active:
        stopflag=True
        joy.detach()
        btn.detach()
        csel.detach()
The highlighted lines above are what was added to the stock Vectorscope sketch app. It works by capturing program flow when the user presses the “menu” button, which signals an exit from the app. The fifo_put_point(coord, col) and related functions are calling C code which was marshalled up to the Micropython layer (more on this in a sec).
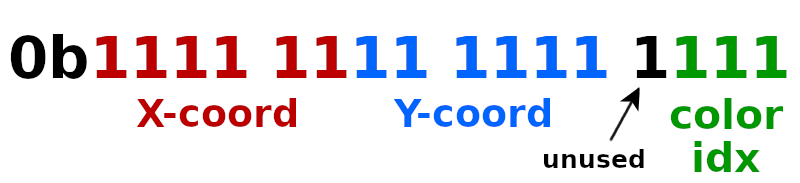
The sketch app uses a 40×40 grid with five colors (white, black, red, green, blue). We assume all pixels are white and only upload pixels of a different color. Some run-length encoding could have made things a bit leaner, but a simple approach to bit-packing worked for us.
Most of the firmware work went into the C layer and custom Micropython build. The build itself is… shall we say “bespoke”? (ie. “it’s a hack!”) It was not really in a state to publish to a repo. The custom i2c stuff is an extension of the work we already did on the Golioth Ostentus faceplate. We’ll be publishing that project publicly in a few months, so for now, here’s a Gist of the pertinent code for those who are curious.
For Supercon, the i2c files implement a FIFO, into which data from the Micropython layer may be placed. Two i2c register addresses were added, one indicating data is available, the other will send the data. It forms 36-byte packets, with the first packet containing metadata.
The Software
The Rust backend leveraged Tokio, an asynchronous runtime, and its sibling web server framework, Axum. At startup, a thread was spawned to connect to Golioth over Websockets and listen for new messages. Upon receiving a message, this thread checks whether the data was fragmented by comparing the provided total point count with the number of points in the message. If so, it waits for subsequent messages until all points had been acquired for a given image.
Given the time constraints, we wanted to make the application as lean as possible to simplify connecting to external services when deploying. The information we needed to persist after processing an image included the image itself and the name that had been provided via the previously mentioned RPC. For the image data, a blob storage service was a natural solution.
As a hack around introducing another data store to maintain a list of the images, their links, and their names, we encoded the name and UID into the name of the image file in blob storage bucket. When a request arrives for badgecase.io, the server fetches a list of objects in the buckets, parses the file names to extract the user-chosen image name, and renders an HTML page from a handlebars template using the names and links. Some lightweight server-side caching reduced the overhead of accessing the bucket on every request, and the cache can easily be invalidated upon processing a new image, meaning that new images are displayed in the showcase just moments after submission.
The popular image crate made building the PNG from the encoded 16-bit coordinate points fairly straightforward.
fn build_png(data: Vec<i16>) -> image::ImageBuffer<image::Rgb<u8>, Vec<u8>> {
    let mut buffer = image::DynamicImage::new_rgb8(40, 40).to_rgb8();

    let mut state = [[PixelColor::White; 40]; 40];
    for p in data {
        let (x, y, color) = parse_point(p);
        state[x as usize][y as usize] = color;
    }

    for x in 0..40 {
        for y in 0..40 {
            let pixel = buffer.get_pixel_mut(x, y);
            *pixel = image::Rgb(state[x as usize][y as usize].rgb().into());
        }
    }

    imageops::resize(&buffer, 400, 400, imageops::FilterType::Nearest)
}
Parsing the points was essentially the inverse of the operation in the firmware, but Rust’s enum support made working with our custom color scheme much more enjoyable.
#[derive(Clone, Copy, Debug)]
pub enum PixelColor {
    Black,
    White,
    Red,
    Blue,
    Green,
}

impl PixelColor {
    fn new(i: u8) -> PixelColor {
        match i {
            1 => PixelColor::Red,
            2 => PixelColor::Green,
            3 => PixelColor::Blue,
            4 => PixelColor::Black,
            _ => PixelColor::White,
        }
    }

    fn rgb(&self) -> (u8, u8, u8) {
        match *self {
            PixelColor::Black => (0, 0, 0),
            PixelColor::White => (255, 255, 255),
            PixelColor::Red => (255, 0, 0),
            PixelColor::Blue => (0, 0, 255),
            PixelColor::Green => (0, 255, 0),
        }
    }
}

fn parse_point(point: i16) -> (u8, u8, PixelColor) {
    (
        (point >> 10) as u8 & 0b00111111,
        ((point >> 4) as u8 & 0b00111111),
        PixelColor::new(point as u8 & 0b00001111),
    )
}
Deploying the application involved building an OCI image and pushing it up to Google Artifact Registry, then with a few clicks we had it running on Google Cloud Run. Because we had chosen Google Cloud Storage for storing the images, setting up access from the Cloud Run service was seamless. The last bit was mapping the Cloudflare-managed domain to the service because what is a hack project without a proper catchy domain?
Closing Thoughts
We spent way too much time on this hack… it was so much fun! Although our initial dream of capturing the vector traces didn’t materialize, it was still a blast seeing people make a simple drawing and having it appear almost instantly on the website. It also highlights how much stuff there can be in the process from a cellular device up to Cloud, and how Golioth makes things even easier. We only just got back home and already we can’t wait to see what happens with next year’s badge!

No comments yet! Start the discussion at forum.golioth.io