Looking to add a dash of connectivity to your Zephyr project? One really easy approach is to offload the connectivity to an inexpensive ESP32 module. I recently did this as part of a hack day project where I wanted to get device location using a site survey of available Wi-Fi access points. But the same approach can also unlock full Wi-Fi connectivity. Does this sound familiar? Last week I also wrote how to add HCI Bluetooth in a similar manner. Let’s see how this is different.
Hardware and Firmware Prerequisites
The great news is that the folks at Espressif already package a set of pre-compiled binary that includes support for the ESP32 module in AT mode. Yes, these are the AT modem commands of yore, they never went away and remain a reliable way for your main processor to control a separate modem. To utilize this approach you’ll need:
- An ESP32 module
- A way to power the ESP32 module
- Two available pins on your host microcontroller for a serial connection with the modem
- An available UART to handle modem communications
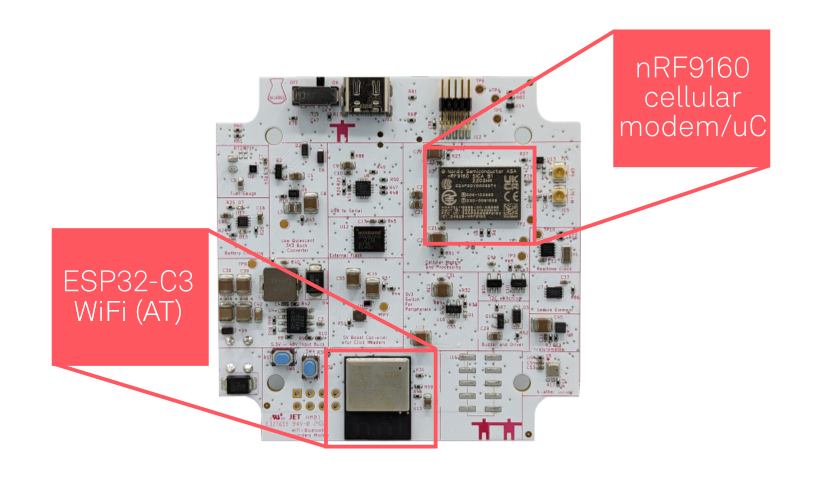
It just so happens that the Golioth Aludel Elixir board we use for IoT demonstration already has a host controller (nRF9160) connected to an ESP32 module (the ESP32-C3 mini).
 Preparing and Flashing the ESP AT Binary
Follow the Downloading Guide on Espressif’s docs site to download the binary and flash it to the device.
We’ll skip the full details since the guide covers the process quite well, but I can share some helpful tidbits in this area. Each different type of ESP32 module has its own binary package so be sure to select the device family (ESP32, ESP32-C3, etc) on the upper left of the download guide to get instructions and download links tailored to your hardware. You must download the binary that exactly matches your device.
If you need to modify the pre-compiled binaries, there is a tool and documentation for that. The most relevant sections cover changing the AT UART pins and baud, and tweaking the Wi-Fi power/starting channel/etc.
I used the “To download the bins separately into multiple addresses…” section to flash the firmware with the follow command:
esptool.py --chip auto --port /dev/ttyUSB0 --baud 115200 --before default_reset --after hard_reset write_flash -z --flash_mode dio --flash_freq 40m --flash_size 4MB 0x0 bootloader/bootloader.bin 0x60000 esp-at.bin 0x8000 partition_table/partition-table.bin 0xd000 ota_data_initial.bin 0x1e000 at_customize.bin 0x1f000 customized_partitions/mfg_nvs.binIf you happen to be using the Aludel Elixir, the Golioth Zephyr Boards repository has additional info about programming this particular board.
Enable ESP-AT based Wi-Fi on the Zephyr Host
Now let’s update your Zephyr project to use the Wi-Fi modem. First up, add a devicetree definition that assigns a UART:
&uart1 {
    status = "okay";
    current-speed = <115200>;
    pinctrl-0 = <&esp_uart_default>;
    pinctrl-1 = <&esp_uart_sleep>;
    pinctrl-names = "default", "sleep";

    esp_wifi: esp-wifi {
        compatible = "espressif,esp-at";
        power-gpios = <&gpio0 18 (GPIO_ACTIVE_HIGH | GPIO_OPEN_DRAIN)>;
        status = "okay";
    };
};

&pinctrl {
    esp_uart_default: esp-at-uart-default {
        group1 {
            psels = <NRF_PSEL(UART_TX, 0, 25)>,
                <NRF_PSEL(UART_RX, 0, 31)>;
        };
    };

    esp_uart_sleep: esp-at-uart-sleep {
        group1 {
            psels = <NRF_PSEL(UART_TX, 0, 25)>,
                <NRF_PSEL(UART_RX, 0, 31)>;
            low-power-enable;
        };
    };
};
This devicetree overlay is for an nRF9160. You can see that we’ve mapped the RX/TX pins in the pinctrl node. The esp_wifi node is added to uart1, along with pointers to those pinctrl assignments. The final step is to enable networking, Wi-Fi, and the ESP AT library in Zephyr.
CONFIG_NETWORKING=y
CONFIG_WIFI=y
CONFIG_WIFI_ESP_AT=y

# Optional: to use WiFi shell commands
CONFIG_SHELL=y
CONFIG_NET_L2_WIFI_SHELL=y
Using Wi-Fi from the Zephyr Shell
As I mentioned, I needed Wi-Fi on my hack day project because I wanted to use the Golioth location service. It can scan for the 10 strongest Wi-Fi access points (APs), send them to Golioth, and return precise Latitude and Longitude coordinates!
I built the Zephyr hello_world sample using the overlay and config files from the previous section. Now I can run a Wi-Fi scan from the serial terminal (AP names changed to protect the innocent):
uart:~$ wifi scan
Scan requested

Num  | SSID                             (len) | Chan (Band)   | RSSI | Security        | BSSID             | MFP
1    | anonymized-ap-name-1             11    | 6    (2.4GHz) | -52  | WPA2-PSK        |                   | Disable
2    | anonymized-ap-name-2             19    | 6    (2.4GHz) | -52  | WPA2-PSK        |                   | Disable
3    | anonymized-ap-name-3             13    | 6    (2.4GHz) | -52  | WPA2-PSK        |                   | Disable
4    | anonymized-ap-name-4             7     | 1    (2.4GHz) | -57  | WPA2-PSK        |                   | Disable
5    | anonymized-ap-name-5             18    | 6    (2.4GHz) | -66  | WPA2-PSK        |                   | Disable
6    | anonymized-ap-name-6             13    | 1    (2.4GHz) | -89  | WPA2-PSK        |                   | Disable
7    | anonymized-ap-name-7             13    | 11   (2.4GHz) | -90  | WPA2-PSK        |                   | Disable
8    | anonymized-ap-name-8             19    | 11   (2.4GHz) | -93  | WPA2-PSK        |                   | Disable
Scan request done
Hmm, perhaps I should change the channel setting on some of my routers for better performance? You can connect to an access point using the Wi-Fi shell, however there is limited utility in doing so right now.
uart:~$ wifi connect -s access_point_name -p access_point_password -k 1
Connection requested
Connected
Here we can see that the connection to the AP is established (and I observed that it happens almost instantly). However, the sample code we’re running doesn’t have DHCP enabled, so the host doesn’t haven an IP address and no data can be sent or received. Also the Cellular modem in our setup on the Elixir will take preference, so that would need to be disabled to switch to Wi-Fi. But getting to the next step in the process is the same as for any network connection and is heavily dependent on your application needs.
Everything Can Be IoT
By following this process you can pretty inexpensively add Wi-Fi to any IoT project. Of course the connection itself is only one piece of the IoT puzzle and you still need a way for devices to authenticate, send and receive data, and a way to control your fleet. This is where Golioth shines. We’ve already built the IoT management cloud you’re looking for, and you can take it for a test drive today!

No comments yet! Start the discussion at forum.golioth.io