Last year, I made the decision to do a personal prototype project with Zephyr instead of my go-to prototyping choices of Arduino, MicroPython, and CircuitPython. The latter two I still use a lot for rapid prototyping, as scripting languages like Python are hard to beat.
For the forthcoming project, I already knew where I was heading. I needed a sensor for my garden irrigation system that tracks the water level in my water reservoir. I had two requirements:
- See the water level live on-site
- Have the data transmitted to the internet so that I can see how things are doing while I’m away
The system regularly had leaks and failures in the irrigation pipes, which caused the automated watering pump to not only waste water but also fail to water my plants. This is detrimental during a heat wave! That added an additional requirement of an alarm to alert me of abnormal situations. When I started the project, I reached for Zephyr first. Let’s talk about why.
Why Arduino, anyway?
Change is a constant; no more so, than the early design phases of a product, when requirements rapidly shift. Prototyping is a crucial aspect of any development process and we often employ different tools for this than we do for our production firmware.
In the firmware world, the Arduino framework has been an immense success. Not only for teaching firmware development, but also as a quick and easy way to try out concepts and develop prototype solutions.
Not without controversy though. To this day, many embedded engineers will utter a silent curse on Arduino whenever it is encountered on the way to production. The supposed prototype firmware has morphed into the production firmware and now that needs to be extended with very complex functionality.
When deadlines are near and the stress levels are high, it is very appealing to companies to just keep using the code base that already seems to do 90% of the job. A lot of products end up shipping firmware based on frameworks like Arduino and then try to deal with the “last 10% of the work”. If you have developed software for a while you probably know those famous last 10% can be 90% of the work, completely derailing budgets and timelines.
But what is the issue? At the end of the day, Arduino is just a very light HAL based on C and C++! You can do whatever you could do in a bare metal C project. The emphasis is on “light”, which is very beneficial when you have only very basic requirements. Maybe you can get by just fine with printf() debugging and hitting that compile button in your IDE.
The Arduino HAL’s success was in part due to its simplicity and fully integrated development flow but it offers very few solutions to the modern challenges firmware developers are facing. When you consider the complexities you are faced with in modern devices, Over-the-Air firmware updates, firmware update encryption, Continuous Integration, connection to a cloud service, tracking of device status and metrics, then things start to look different.
Zephyr is changing things up in the industry
The Zephyr Project Real Time Operating System (RTOS) has seen a lot of adoption over the past years, even by Arduino themselves. They became a member of the Zephyr Project in 2023 and now contribute to the code base.
Zephyr is a very “IoT aware” RTOS and offers a lot of robust solutions to many of the very complex topics I mentioned. It is also one of the main targets of the Golioth Firmware SDK for that reason.
When developers first start interacting with Zephyr they often tend to be a bit intimidated. Device Tree and KConfig may be familiar tools for Embedded Linux developers, but not for someone coming from bare metal C or FreeRTOS. (Editor’s note: this is why Golioth offers free training around Zephyr).
Zephyr-specific tooling like the west meta tool means there’s a lot to learn when you start diving into Zephyr. You might start to question if that work is worth it. Especially early on in a development process where you want to move quickly and prove your concepts. You might feel a huge system like Zephyr could slow you down.
Due to the steep learning curve, Zephyr does not really have a reputation for being a tool for prototyping. But I think Zephyr has very much a place in that phase of a project and it comes with a lot of benefits once you move beyond the prototype: You are already in an environment that won’t hold you back when it comes to solving the tough problems of modern production ready firmware.
Now that I am up the (arguably steep) learning curve associated with Zephyr, I think in many cases I can produce a working solution a lot quicker than with Arduino or even MicroPython.
Not just for production grade firmware
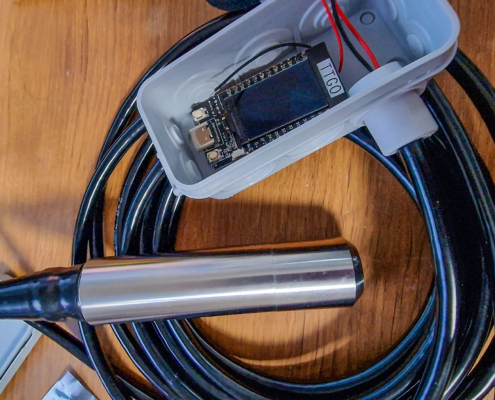
Since I was starting a prototype, I chose an ESP32 dev board I had laying around which came with a nice little OLED screen. For the sensor, I opted for an industrial liquid level sensor. They are essentially pressure sensors in a sturdy form factor that measure the pressure differential of the outside air and the pressure seen in the liquid container.
I needed something rugged and precise to track abnormal water usage so that was a perfect solution. I ended up getting a stable 0.2mm resolution for my water column, much more than I needed. The sensor is a simple 4-20mA current loop that you often see in industrial automation and I connected that to an external precision ADC.
My firmware needs included:
- WiFi provisioning
- Network and application protocol to get the data to a server
- OTA to update the device remotely
- A GUI to show water levels on the OLED
- ADC reads to ingest the sensor data
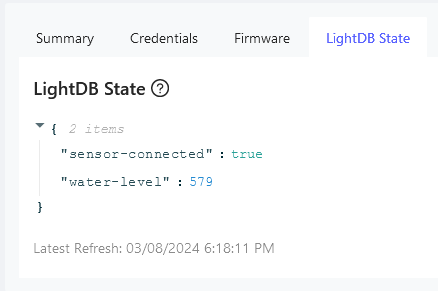
I opted to use Golioth for networking and OTA. While not a typical service for a hobby project, they have a (recently updated) free tier for individuals and it made the whole thing really easy. It only takes a couple lines of code to integrate into any Zephyr project and makes transmitting data to a database as easy as Serial.print(). Having OTA available is a matter of a KConfig option. Most importantly I don’t need to manage an internet facing server application!
net_connect();

golioth_client_t client;
const golioth_client_config_t* client_config = golioth_sample_credentials_get();
client = golioth_client_create(client_config);
golioth_client_register_event_callback(client, on_client_event, NULL);

err = golioth_lightdb_set_int_sync(client, "water-level", water_level/1000, 2);
if (err) {
    LOG_WRN("Failed to transmit water-level: %d", err);
}
I could have directly implemented CoAP or MQTT and host my own server for the receiving side. Both protocols are natively supported by Zephyr, which means I have flexibility if I change my mind on the server side in the future.
OTA firmware updates is also a concept native to Zephyr and very important: no matter what platform I choose! The Arduino ESP32 core has an option for OTA but if you are looking at any other MCU you would have to implement that from scratch which is a whole project in itself.
In Zephyr this is all enabled by the fantastic MCUBoot bootloader.
Abstractions are your friend in a complex world
The platform agnostic nature of Zephyr is powerful. Say you have already written a lot of code and then notice that your chosen MCU does not actually fulfill your needs. You don’t need to start from scratch because all of these advanced APIs are fully abstracted in Zephyr. You can retarget your code to a different platform with minimal code changes. The primary work will be in recreating your devicetree for the new hardware.
Arduino also is known for abstraction, but when it comes to more complex features the Arduino HAL is not defining an interface. Generally, you tend to need to stick to a particular platform if you want to take advantage of the underlying hardware’s fancy features, that is if they are available at all (in Arduino).
Lock-in with a specific IC is a painful lesson we all learned during the chip shortages of 2021 and 2022. Device Tree overlays are a great tool to stay on-top of changing hardware and describe those changes in a clean way. That flexibility is not only important from a risk perspective. Staying flexible during the prototype stage (where requirements change rapidly) allows you to try out different sensors and peripherals.
Changing a sensor in Zephyr is a matter of changing a dozen lines of devicetree definitions without needing to touch a single line of C code. This is made easier when the sensor is “in tree”, but it not the only way to use a new sensor. Devicetree also becomes a powerful tool in the early days of hardware development where your product might go through many revisions and changes. People on your team might be working with different hardware revisions but require the latest bug fixes.
This can quickly become tough to manage in the firmware if you had pin or even IC changes. No need for a ton of #ifdef‘s; all you need is a set of devicetree overlays that describe your various board revisions, the C code can most often stay the same. This not only makes your life easier but also helps reduce mistakes and stale code.
If you are still trying out options you can also interactively work with sensors through the Zephyr Shell, which makes for a great workflow to quickly try out several sensor candidates without writing firmware.
During my project I was unsure whether to choose a different MCU, because the built-in ADC of the ESP32 is quite noisy. In the end, I kept the ESP32 and chose to use an external ADC. My code did not have to change because the ADC API abstracts that away. It was just a matter of defining what ADC my project should use in the devicetree. My code does not need to care if that is an external I2C device or a peripheral internal to my MCU.
/{
    zephyr,user {
        io-channels =
            <&adc_ext 0>;
    };
};

&i2c0 {
    status = "okay";
    adc_ext: mcp3421@68 {
        compatible = "microchip,mcp3421";
        reg = <0x68>;
        #io-channel-cells = <1>;
    };
};

&adc_ext {
    status = "okay";
    channel@0 {
        reg = <0>;
        zephyr,gain = "ADC_GAIN_1";
        zephyr,reference = "ADC_REF_INTERNAL";
        zephyr,acquisition-time = <ADC_ACQ_TIME_DEFAULT>;
        zephyr,resolution = <18>;
        zephyr,differential;
    };
};
That is the benefit of fully abstracted subsystems, your application’s assumptions can stay the same most of the time. Last minute system changes are less painful during firmware development.
Complex UI’s don’t have to be complex to build
For the GUI, I went with LVGL, a popular UI framework that has been integrated into Zephyr.
That was probably the most eye opening experience to me. Normally you would have to mess with display drivers that all work very differently depending on the plugged in display. Then I would need to write code to manually transfer the rendered framebuffer to that display, which again, tends to work differently with each display.
In Zephyr all I have to do is to modify the devicetree for which display driver my OLED needs, the resolution, and the bus it is connected to.
&spi3 {
    status = "okay";
    st7789v_st7789v_ttgo_128x64: st7789v@0 {
        compatible = "sitronix,st7789v";
        spi-max-frequency = <20000000>;
        reg = <0>;
        cmd-data-gpios = <&gpio0 16 GPIO_ACTIVE_LOW>;
        reset-gpios = <&gpio0 23 GPIO_ACTIVE_LOW>;
        width = <135>;
        height = <240>;
        x-offset = <53>;
        y-offset = <40>;
        vcom = <0x19>;
        rgb-param = [CD 08 14];
    };
};
With that done you can write powerful UIs with just a couple lines of code, all the hard stuff is handled behind the scenes. I figured the UI part would be the majority of work for this project, but ended up being done in under an hour.
Often Arduino prototypes tend to have character displays or use the same old school bitmap font because fonts are hard and font systems even harder. In LVGL, you have an array of modern fonts available and it’s fairly easy to include your own font.
Arranging elements is also trivial in LVGL. No need to manually calculate a bunch of stuff like your text length. It has a lot of functions available for laying out complex arrangements.
You can build some really pretty smartphone level UIs with it. These run on very constrained hardware and it doesn’t cost you your sanity in the process!
const struct device *display_dev;
display_dev = DEVICE_DT_GET(DT_CHOSEN(zephyr_display));

lv_obj_t *level_label;
lv_obj_t *status_label;
static lv_style_t level_style;
lv_style_init(&level_style);
lv_style_set_text_font(&level_style, &lv_font_montserrat_48);

level_label = lv_label_create(lv_scr_act());
lv_obj_align(level_label, LV_ALIGN_CENTER, 0, -20);

status_label = lv_label_create(lv_scr_act());
lv_obj_align(status_label, LV_ALIGN_BOTTOM_MID, 0, -50);
lv_obj_add_style(level_label, &level_style, 0);
// display the current water level
lv_label_set_text_fmt(level_label, "%llu", water_level/1000U);
lv_task_handler();
Quick, once you know how to get around
Within a day I had firmware for my hardware and it even looked…pretty!
Since its creation, my device has dutifully reported the water level and withstood the winter season.

The application is ~180 lines of C code, including a lot of error handling. That is really not a lot of code, for so much complex functionality. This is only possible thanks to all of the available abstractions that make writing the actual application logic a breeze. In the background there are multiple threads running but my code doesn’t even need to be aware of that. It is all handled by the kernel and the well-written libraries.
While simple things like an ADC read can be very verbose in Zephyr and a bit more complicated than in Arduino land, the hard parts–the things we often perceive as the last 10%–are a whole lot easier! You don’t want to start empty handed when you are tasked to implement encrypted firmware updates, OTA, telemetry or integrating the cloud team’s new backend system.
The grass is not always greener, of course. Zephyr is still comparatively young in embedded terms and while there are a lot of devices already supported, it is hard to beat the vast amount of drivers available for Arduino. In some situations you might want to do a first board bring up with an existing Arduino driver before implementing a Zephyr driver. License permitting, the driver code could be the basis for a port to Zephyr.
One reason why I think it is so common for firmware to get “stuck” in Arduino-land is because there has not been a good (free) alternative if you wanted to write C (or C++) and not pigeon hole yourself early on into one specific obscure vendor toolchain. If there is nothing obvious to move to, it can make the decision even harder and it will be put off until it’s usually too late.
Concepts like devicetree and a complex build system like CMake can be daunting at first, but there are ripe benefits at the end of the learning curve. If you want to learn Zephyr, Golioth regularly offers free Zephyr training sessions or you can read some of the great blog posts that cover the more gnarly bits of Zephyr in digestible bite sized portions.

No comments yet! Start the discussion at forum.golioth.io