Adding Golioth’s device management features to an existing ESP-IDF project is a snap. The Golioth Firmware SDK has excellent support for Espressif parts. Simply add Golioth as a component in your build, enable it in the CMake and Kconfig files, and start using the API functions.
Today I’m going to walk through how to do this using an ESP32 development board, however, any of the ESP32 family of chips (ESP32s2, ESP32c3, etc.) will work. Advanced users will also want to review the Golioth Firmware SDK Integration Guide which is the bases for this post.
Walkthrough
Since this article is about adding Golioth to an existing ESP-IDF application, I assume you already have the ESP-IDF installed. If you do not, you may consider following our ESP-IDF quickstart guide before continuing.
For illustration purposes, I’ve copied Espressif’s /esp-idf/examples/wifi/getting_started/station example code to a folder called esp_hello_golioth and will add the Golioth device management features to the program.
cp -r ~/esp-idf/examples/wifi/getting_started/station esp_hello_golioth
If you are following along, you will want to set your WiFi credentials either by using menuconfig or by changing the default values in main/Kconfig.projbuild.
1. Install Golioth as a component
Add the Golioth Firmware SDK as a submodule of your project. (Note that this means you need to have your project under version control. Hint: git init)
cd ~/esp_hello_golioth
git submodule add https://github.com/golioth/golioth-firmware-sdk.git third_party/golioth-firmware-sdk
git submodule update --init --recursive
2. Add the Golioth SDK to your CMake configuration
We need to tell CMake to include the Golioth SDK in the build. This is done by editing the project’s top-level CMakeLists.txt file and adding the following line before the project() directive in that file:
list(APPEND EXTRA_COMPONENT_DIRS third_party/golioth-firmware-sdk/port/esp_idf/components)
We also need to add the Golioth SDK as a dependency. This is done by editing the deps list in the CMake file in the main directory of the project. For this ESP-IDF example code, there are no existing deps so I added the following to the top of main/CMakeLists.txt:
set (deps
     "golioth_sdk"
)
3. Add Kconfig settings
Golioth needs MbedTLS so it must be enabled via the Kconfig system. I created an sdkconfig.defaults file in the top-level folder and added the following:
CONFIG_MBEDTLS_SSL_PROTO_DTLS=y
CONFIG_MBEDTLS_PSK_MODES=y
CONFIG_MBEDTLS_KEY_EXCHANGE_PSK=y
CONFIG_GOLIOTH_AUTO_LOG_TO_CLOUD=1
CONFIG_GOLIOTH_COAP_REQUEST_QUEUE_MAX_ITEMS=20
The final two symbols were added because I plan to send logging messages to the Golioth servers.
4. Use Golioth API calls in your C code
Now that we’ve unlocked Golioth we can start making API calls. Gain access to the functions by including the Golioth header file:
#include "golioth.h"
For this demo I created a counter to keep track of a forever loop. After a five-second pause, the counter value is sent to Golioth as a Log message, then sent as a LightDB State value. The highlighted code beginning at line 14 is what I added.
void app_main(void)
{
    //Initialize NVS
    esp_err_t ret = nvs_flash_init();
    if (ret == ESP_ERR_NVS_NO_FREE_PAGES || ret == ESP_ERR_NVS_NEW_VERSION_FOUND) {
      ESP_ERROR_CHECK(nvs_flash_erase());
      ret = nvs_flash_init();
    }
    ESP_ERROR_CHECK(ret);

    ESP_LOGI(TAG, "ESP_WIFI_MODE_STA");
    wifi_init_sta();

    //Everything above this line is unchanged from the ESP-IDF example code

    const char* psk_id = "your-golioth@psk-id";
    const char* psk = "your-golioth-psk";

    golioth_client_config_t config = {
            .credentials = {
                    .auth_type = GOLIOTH_TLS_AUTH_TYPE_PSK,
                    .psk = {
                            .psk_id = psk_id,
                            .psk_id_len = strlen(psk_id),
                            .psk = psk,
                            .psk_len = strlen(psk),
                    }}};
    golioth_client_t client = golioth_client_create(&config);

    uint16_t counter = 0;
    while(1) {
        GLTH_LOGI(TAG, "Hello, Golioth! #%d", counter);
        golioth_lightdb_set_int_async(client, "counter", counter, NULL, NULL);
        ++counter;
        vTaskDelay(5000 / portTICK_PERIOD_MS);
    }
}
For simplicity I hardcoded the Golioth credentials (PSK-ID/PSK) which is not a best practice as hardcoded credentials will not survive a firmware upgrade. Both shell and Bluetooth provisioning are demonstrated in the golioth_basics example code which stores these credentials in non-volatile flash.
See the results on the Golioth Console
The serial output of this app shows the Golioth client connecting and Log messages being sent.
I (937) wifi:AP's beacon interval = 102400 us, DTIM period = 2
I (1647) esp_netif_handlers: sta ip: 192.168.1.159, mask: 255.255.255.0, gw: 192.168.1.1
I (1647) wifi station: got ip:192.168.1.159
I (1647) wifi station: connected to ap SSID:TheNewPeachRepublic password:123456789101112internetplease
I (1657) golioth_mbox: Mbox created, bufsize: 2184, num_items: 20, item_size: 104
I (1667) wifi station: Hello, Golioth! #0
W (1677) wifi:<ba-add>idx:0 (ifx:0, c6:ff:d4:a8:fa:10), tid:0, ssn:1, winSize:64
I (1677) golioth_coap_client: Start CoAP session with host: coaps://coap.golioth.io
I (1697) libcoap: Setting PSK key

I (1697) golioth_coap_client: Entering CoAP I/O loop
I (1917) golioth_coap_client: Golioth CoAP client connected
I (6707) wifi station: Hello, Golioth! #1
I (11707) wifi station: Hello, Golioth! #2
I (16707) wifi station: Hello, Golioth! #3
I (21707) wifi station: Hello, Golioth! #4
I (26707) wifi station: Hello, Golioth! #5
I (31707) wifi station: Hello, Golioth! #6
I (36707) wifi station: Hello, Golioth! #7
I (41707) wifi station: Hello, Golioth! #8
I (46707) wifi station: Hello, Golioth! #9
Both Log messages and State data can be accessed from the tabs along the top of the device view in the Golioth Console. Navigate there by selecting Devices from the left sidebar menu and then choosing your device from the resulting list.
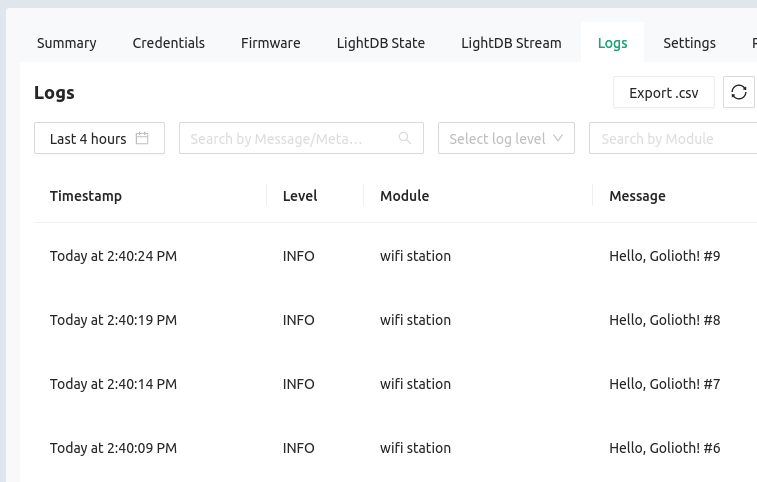
The log view shows each message as it comes in, and from the timestamps we can see that the five-second timer is working. For long-running operations, there are time-window selection tools as well as filters for log levels, devices, and modules.
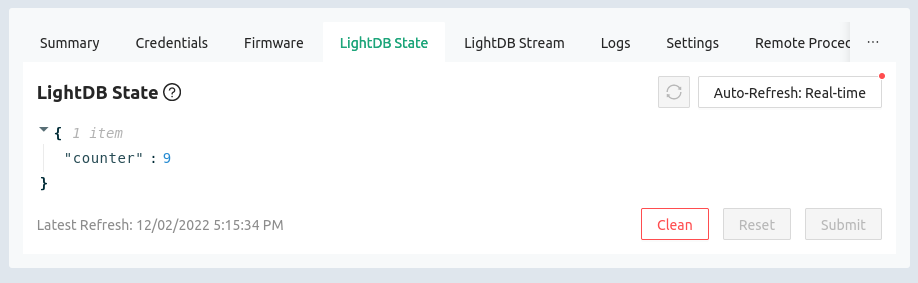
The LightDB State view shows persistent data so you will always see the most recently reported value at the “counter” endpoint. Make sure the refresh dialog in the upper right is set to Auto-Refresh: Real-time to ensue you see the updates as they arrive from the device.
Give Golioth a try!
We built Golioth to make IoT design easier for firmware developers. We’d love it if you took our platform for a test-drive! With our Dev Tier, your first 50 devices are always free. Grab an ESP32 and you’ll have data management, command and control, and OTA firmware update in your toolbelt in no time.

No comments yet! Start the discussion at forum.golioth.io