This tutorial was inspired by and a response to the tutorial about how to build your Zephyr application in a standalone folder. I have done exactly that before, but I also wanted to include all my dependencies in that separate folder.
Background and motivation
I need to maintain different firmware with different Zephyr versions and trees. For example, I maintain the following directories:
- Nordic’s Zephyr-variant (NCS) for the nRF9160
- Base Zephyr for Atmel-MCUs
- Base Zephyr, but locked to a particular version (ie. “2.7.0”)
We also have several custom boards. These are currently maintained in each project, but could be moved to a separate dependency if we want to use the same board overlay files in multiple projects.
Instead of trying to swap a single Zephyr-installation between all of these, I did some research into using west and its manifest file to automatically set up my project folders to include all dependencies. I also wanted to ensure our build server didn’t require any manual work to build different projects. The Zephyr docs present this topic in depth, and are recommended reading if you want to set this up.
Let’s look at how we can set up a project to fit a wider range of needs.
Project structure
Most of my projects are kept in my “Dev” folder, so for this example we’ll be using ~/Dev/app_zephyr as the root directory of the project.
I put my application source in application, which is further split into at least boards and src (you can add any folder you like here). You’ll note this is the same structure as any of the Zephyr or Golioth samples you see; in fact, you can copy a sample as the starting point (such as <Zephyr SDK Install location>/zephyr/samples/basic/blinky). The other folders include deps for dependencies and build for the build output folder.
Inside the root folder, add .west/config. This is a plain text file describing to west where it should look for the manifest file and where Zephyr should be placed.
[sourcecode lang=”yaml”]
[manifest]
path = application
[zephyr]
base = deps/zephyr
[/sourcecode]
Drawbacks
- The initial clone and
west updateof a project set up like this takes some time. - This method uses quite a bit of disk space because each project carries around the Zephyr dependencies, as opposed to having your application live within the Zephyr SDK.
- Ensuring you get updates to all your projects means you need to update the projects in your manifest file to a new revision manually (not really a drawback in my eyes – I want control!)
Let’s go through the manifest-file itself step by step. It’s found in application/west.yml:
[sourcecode lang=”yaml”]
manifest:
version: 0.7
defaults:
remote: zephyrproject
remotes:
– name: zephyrproject
url-base: https://github.com/zephyrproject-rtos
– name: mcutools
url-base: https://github.com/mcu-tools
projects:
– name: zephyr
repo-path: zephyr
revision: v2.7.0
import:
path-prefix: deps
path: zephyr
– name: mcuboot
remote: mcutools
repo-path: mcuboot
revision: v1.7.2
path: deps/mcuboot
self:
path: application
[/sourcecode]
- The manifest version being set to 0.7 simply means west (the meta tool) must be at version 0.7 or higher to parse this correctly.
- Default attributes for the project are not required, but in this case lists the main remote.
- Remotes lists where west should look for project repos.
- Projects lists the full range of repositories we’ll pull in as dependencies. This includes the revision, so we have control over upgrades when they are available. I want to prevent breaking changes from entering my project without my knowledge.
- The
self: path: applicationis used to further define where in the project tree thewest.ymlfile is compared to the root of the project.
I feel that the projects key is the true turning point of this manifest. By adding to this we can make Zephyr pull any git repository we want, and put it in our dependencies-folder. We specify the project name, a remote (if different from the specified default), a repo-path on the remote (defaults to name), a revision (defaults to master) and a local path (with a slight footnote for this one).
There is a special key here as well that makes this work, import will make west import the projects from the manifest file of that project as well. This means that when running west update on this manifest, west will first clone all projects in this manifest, then run west update on the manifest file in the specified project, and clone all projects from that, with the specified path-prefix for all those. I’ve used this for the Zephyr-include, but not for the mcutools.
Build
In practice, this means that my project structure for the manifest file above after running west update will look like this:
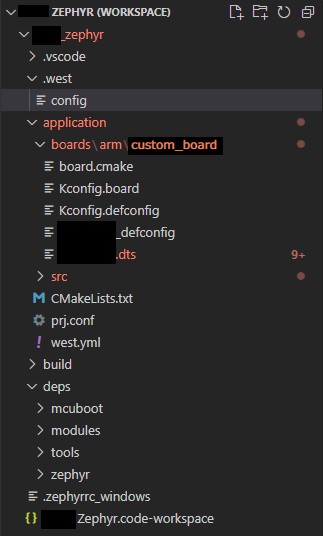
- app_zephyr/
    - .west/
        - config
    - application/
        - boards/
            - arm/
                - ah_1202a/
        - src/
        - CMakeLists.txt
        - prj.conf
        - west.yml
    - deps/
        - mcuboot/
        - modules/
        - tools/
        - zephyr/
    - .gitignore
Your custom board *.dts-files can include all the root overlays from the Zephyr-dependency or any other projects. (I’ve also set this up so VS Code can do IntelliSense of these DTS files, that’s just a matter of setting the correct includePaths.)
From here, you can run west build and have it use your custom board-files, source and everything. In my case:
cd application
west build -p -b ah_1202a -d ../build
Revision Control
One of the benefits of a method like this is the reduced amount of files going into revision control. You don’t need to index all of the Zephyr directory files in your project repo. This is a bad idea anyway, given the size of the project and the almost certain guarantee they will be out of date the next time you pull your project. Locking the Zephyr version in west.yml will ensure that your project is always pulling from the expected version of an SDK or Zephyr repo. Adding a .gitignore file as shown below to your main repository will reduce your total footprint and only capture the unique elements of your project–your application code.
[sourcecode lang=”yaml”]
deps/
build/
.vscode/
[/sourcecode]
Build it your way
The first step to building an optimal workflow for your company or personal development process is understanding how your build system works. The above method is far from the only way of doing things, but helps to give more precise control over what is tracked and what is pulled in from external sources.

No comments yet! Start the discussion at forum.golioth.io