Today we’ll walk through the process of securely storing credentials on a Nordic nRF91 modem. Whether you’re using the nRF9161 or the nRF9151, both have a key management feature which stores credentials (certificates or pre-shared keys) for authentication using offloaded sockets. This approach works very well with Golioth and is well worth your consideration as you develop your IoT fleet.
Today we’re focusing on a concise description of what makes up each type of credential (and where to find them) and two different approaches to getting these assets onto the nRF91.
Anatomy of a Credential
When connecting to Golioth using a credential stored on the nRF91 modem, you choose between two different types: x.509 certificates or pre-shared keys (PSK). By far, the most secure approach is to use a certificate, but I’ll discuss both types along the way.
x.509 Certificates
You will need to write three different assets to the nRF91 modem when using certificates:
- Root CA Certificate (download)
- Client Certificate
- Client Private Key
The Root CA Certificate is issued by a trusted Certificate Authority (CA). Golioth has used Let’s Encrypt in the past but we are now moving to acting as our own CA. You can download the Root CA Certificate used by Golioth in the Golioth Firmware SDK which now includes both the ISRG Root X1 and Golioth Root X1 certificates.
The client certificate and client private key are parts of the credential that you generate for each device in your fleet. Please see the Golioth Certificate Authentication page for details on how to generate certificates to use with each of your devices.
Here’s an example of what the client certificate and private key look like:
# Client Certificate

-----BEGIN CERTIFICATE-----
MIIBaTCCAQ4CFF2/D7xgexOTaB5wWKqFalqC0sUoMAoGCCqGSM49BAMCMCQxCzAJ
BgNVBAYTAkJSMRUwEwYDVQQDDAxSb290IGdvbGlvdGgwHhcNMjUwMjE0MTc1NzM3
WhcNMjYwNjI5MTc1NzM3WjBJMQswCQYDVQQGEwJCUjEbMBkGA1UECgwSZGV2ZWxv
cGVyLXRyYWluaW5nMR0wGwYDVQQDDBRleGFtcGxlLW5yZjkxLWRldmljZTBZMBMG
ByqGSM49AgEGCCqGSM49AwEHA0IABL2m6SgzFSJ/PLBWetUKZI68Stjs2vZEA70G
w2NONPFKW9mGRHpWN+CpsauStRlQlYkIc0dc9aZVi0dC2/RotEIwCgYIKoZIzj0E
AwIDSQAwRgIhAJII64udcXbbPAEytOuWnUTXgfDIsR7rsxpRYefx291hAiEA+1zn
7KrASULcd78oB6cspK8s/jTkMdUTvJjLCT5z4I4=
-----END CERTIFICATE-----

# Client Private Key

-----BEGIN EC PRIVATE KEY-----
MHcCAQEEIHLeIzVEiySQYNtl2leBFx3aXkYaauYiiIbGrPEUMrOeoAoGCCqGSM49
AwEHoUQDQgAEvabpKDMVIn88sFZ61QpkjrxK2Oza9kQDvQbDY0408Upb2YZEelY3
4Kmxq5K1GVCViQhzR1z1plWLR0Lb9Gi0Qg==
-----END EC PRIVATE KEY-----
Pre-Shared Key (PSK)
You will need to write two different assets to the nRF91 modem when using PSK authentication:
- PSK
- PSK Identity (PSK-ID)
Both PSK and PSK-ID are stored on the device page of your Golioth project. Please see the Management Device and Credentials documentation to learn how to retrieve them.
Here’s an example of what these assets look like:
# PSK-ID
example-nrf91-device@developer-training

# PSK
example-weak-psk-value
Prepare the modem to store credentials
The nRF91 modem must be flashed with a firmware capable of storing credentials. The easiest method is use to the AT Client sample in the nRF Connect SDK. Simply build and flash this application to your modem. It is, of course, possible to build this functionality into your own application.
How to store credentials on an nRF91 modem using nRF Connect for Desktop
The Nordic nRF Connect for Desktop tool includes a Serial Terminal app that can be used to issue AT commands, and a Cellular Monitor app that may be used to manage assets in the modem’s secure storage.
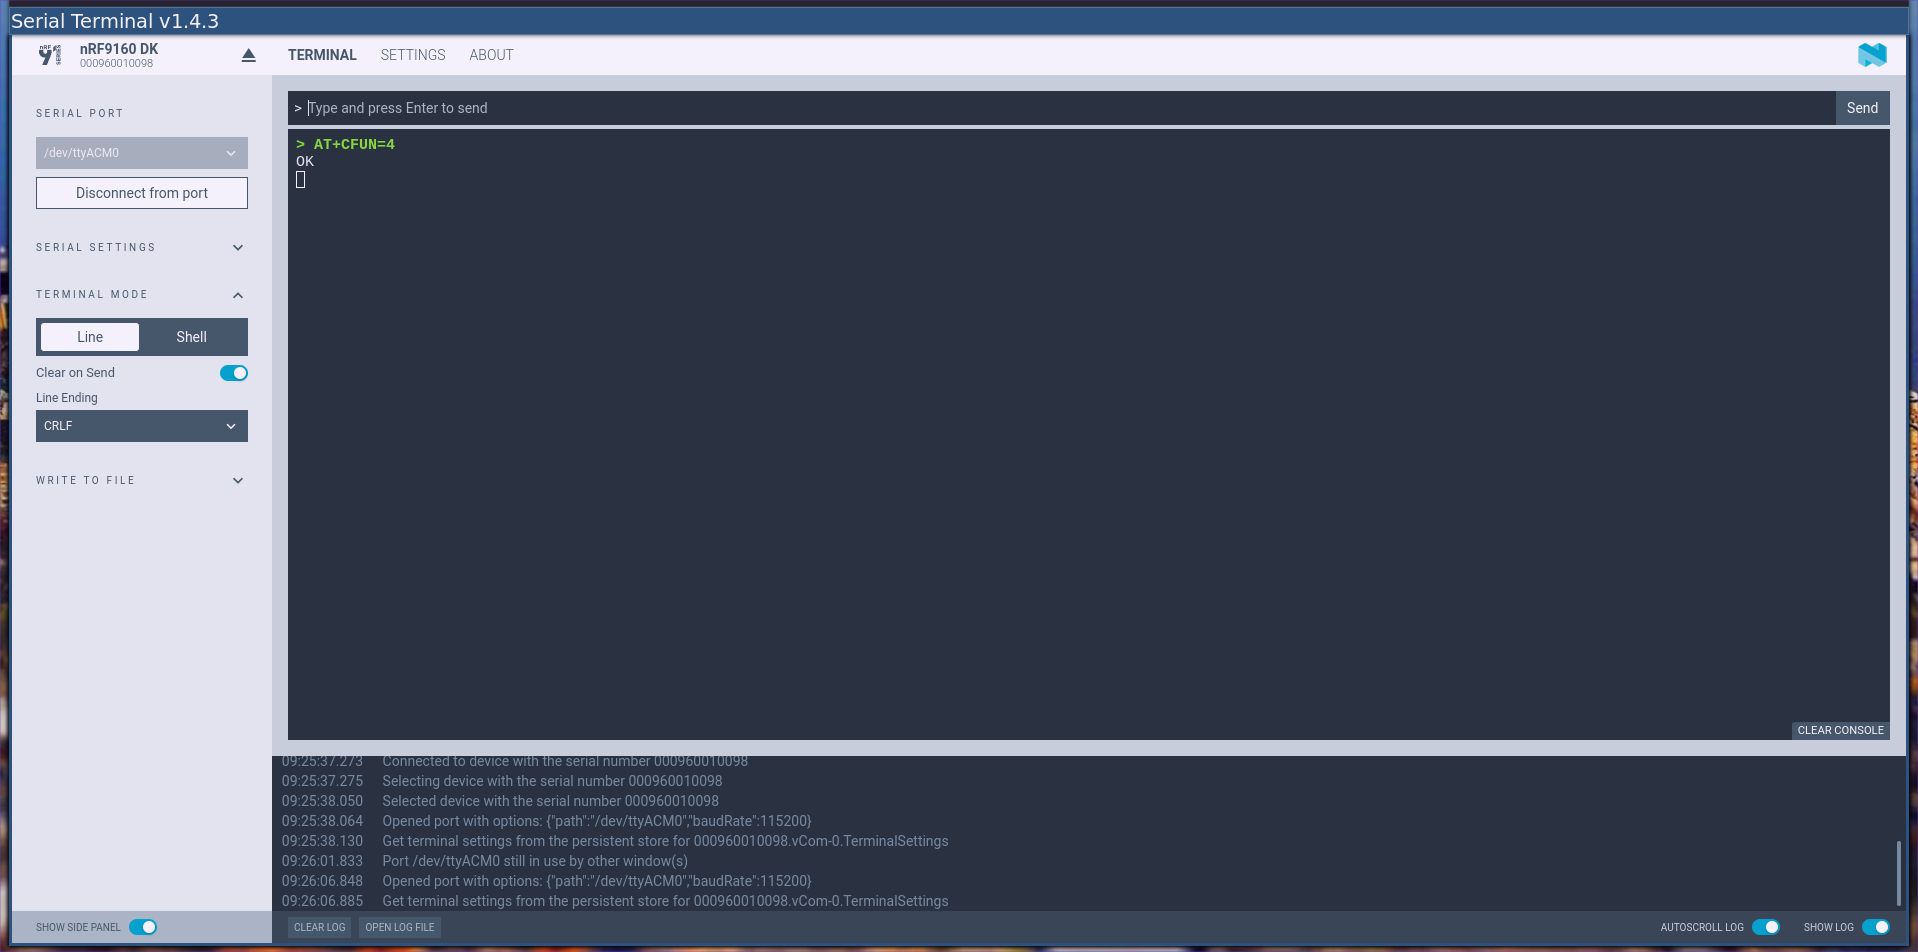
- Ensure your modem is stopped by connecting to the nRF91 via a serial terminal and issuing the
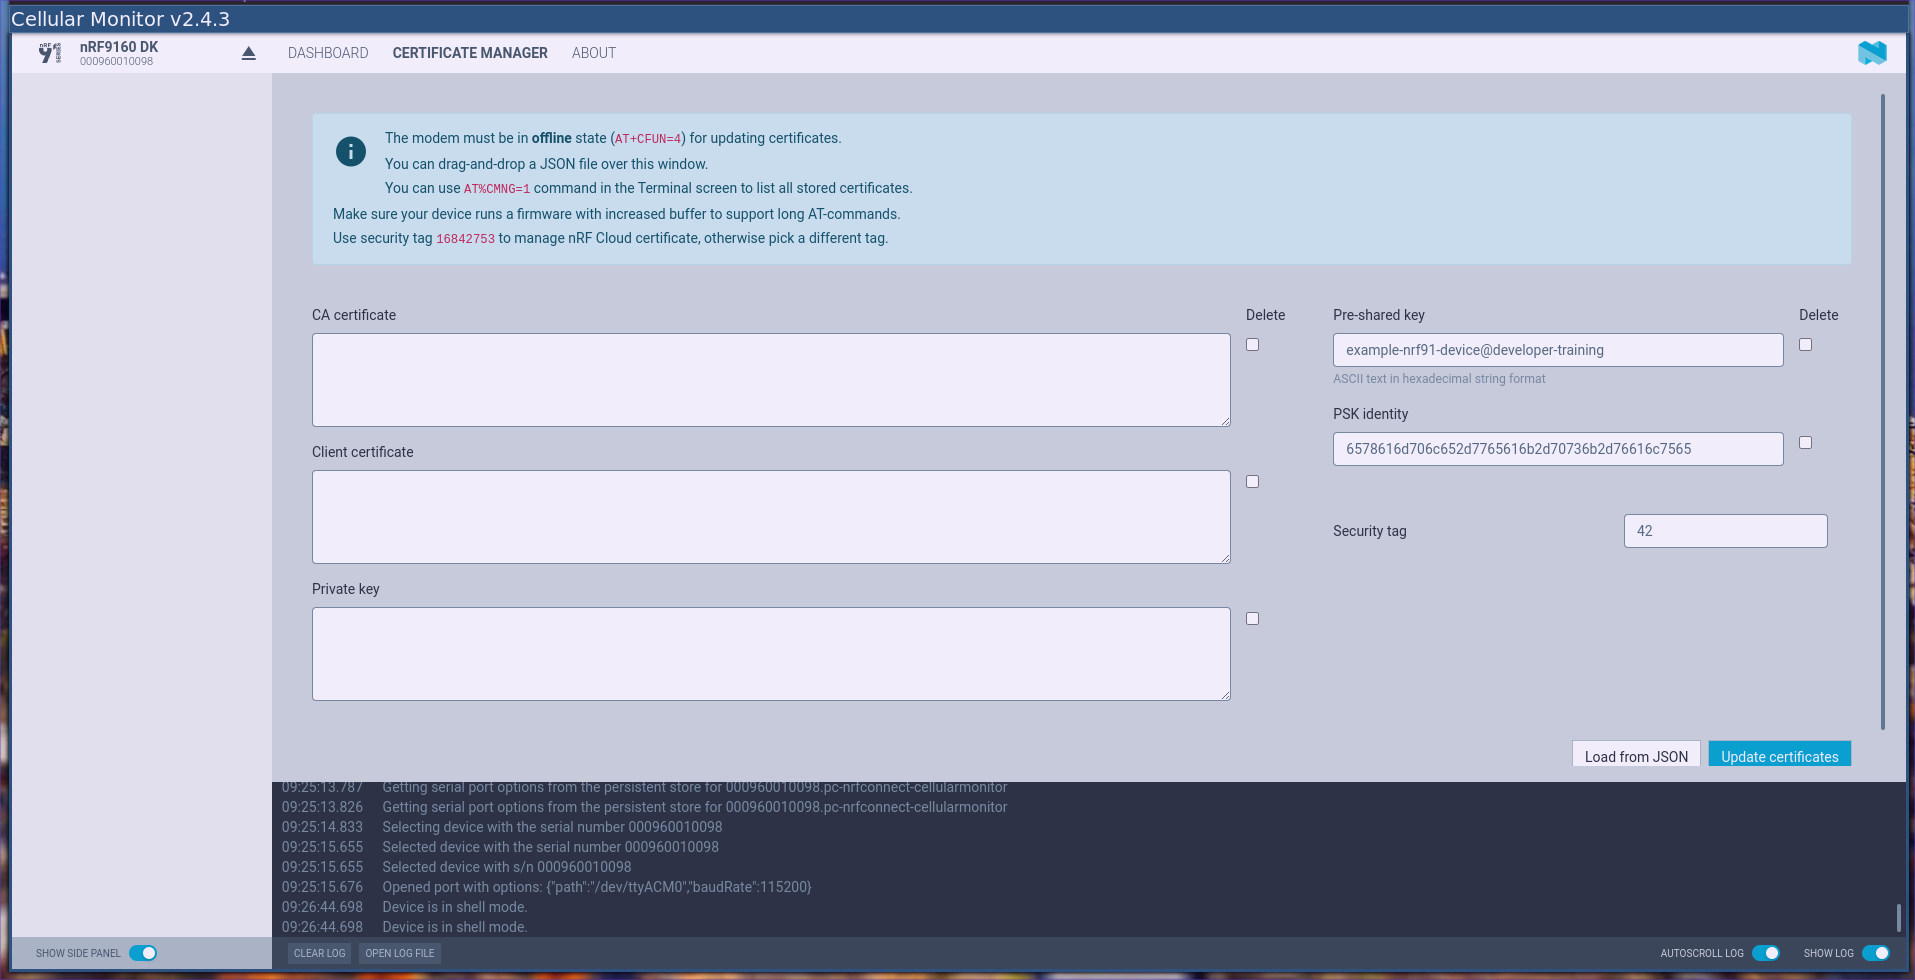
AT+CFUN=4command. - Open the Cellular Monitor app, choose the device from the drop down menu in the top left, and select the Certificate Manager tab along the top center of the view.
- Enter a
Security tagyou’d like to use for your credential. Use the same tag for each part of your credential. We have written about tags in the past for offloaded sockets. - Use the three boxes at the left if you’re using certificate authentication, or the two boxes a the right if you are using a pre-shared key. (When using PSK-ID/PSK, make sure to convert the PSK to a hex string).
I have found that each part of the certificate must be written in a separate step to avoid modem errors. Your mileage may vary.
How to store credentials on an nRF91 modem using AT commands in a serial terminal
You also have the option to open a serial terminal and issuing AT commands yourself, instead of using the nRF Connect for Desktop method (which wraps a GUI around the AT commands). We did this when we provisioned 10 Thingy91s in a previous blog post / video.
# Stop the modem
> AT+CFUN=4
OK

# Store PSK credential
> AT%CMNG=0,42,4,example-nrf91-device@developer-training
OK
> AT%CMNG=0,42,3,6578616d706c652d7765616b2d70736b2d76616c7565
OK

# Store Certificate credential
> AT%CMNG=0,94,0,"-----BEGIN CERTIFICATE----- MIICIDCCAaagAwIBAgIUAO6PpiD3yUhieXYXqJQ/9DvnKH0wCgYIKoZIzj0EAwMw PzELMAkGA1UEBhMCVVMxFjAUBgNVBAoTDUdvbGlvdGgsIEluYy4xGDAWBgNVBAMT D0dvbGlvdGggUm9vdCBYMTAeFw0yNDExMTkxNTUyMzRaFw00NDExMTQxNTUyMzNa MD8xCzAJBgNVBAYTAlVTMRYwFAYDVQQKEw1Hb2xpb3RoLCBJbmMuMRgwFgYDVQQD Ew9Hb2xpb3RoIFJvb3QgWDEwdjAQBgcqhkjOPQIBBgUrgQQAIgNiAARK70aOheZr t6DtDY6Lc3Qppn/BzuvBzhdIDYSlUytH4Pr8yuFYbOcszyu2ilijsDctsg8VFigU 98iB7/sa+UE0umE9ZLjKaPz8qZzdDJm5gSVfenje9Y8uWPhGO1jJ+DSjYzBhMA4G A1UdDwEB/wQEAwIBBjAPBgNVHRMBAf8EBTADAQH/MB0GA1UdDgQWBBTOjrwJUtiY wSPgCD1EAAZFcV1W8TAfBgNVHSMEGDAWgBTOjrwJUtiYwSPgCD1EAAZFcV1W8TAK BggqhkjOPQQDAwNoADBlAjB9LcL3H1sKU6hRrgqZVOhRKgqpR38kVmxgQuJsk1N3 5vVNdf+3g4NnnEuVIk3VpAICMQCkmf1OmtMyCAPQdTU+MwLpzIBYG/3SyZUzsMHA HvRPKGpAY+0ejfKaLVJXQmsxB4M= -----END CERTIFICATE-----"
OK
> AT%CMNG=0,94,1,"-----BEGIN CERTIFICATE----- MIIBaTCCAQ4CFF2/D7xgexOTaB5wWKqFalqC0sUoMAoGCCqGSM49BAMCMCQxCzAJ BgNVBAYTAkJSMRUwEwYDVQQDDAxSb290IGdvbGlvdGgwHhcNMjUwMjE0MTc1NzM3 WhcNMjYwNjI5MTc1NzM3WjBJMQswCQYDVQQGEwJCUjEbMBkGA1UECgwSZGV2ZWxv cGVyLXRyYWluaW5nMR0wGwYDVQQDDBRleGFtcGxlLW5yZjkxLWRldmljZTBZMBMG ByqGSM49AgEGCCqGSM49AwEHA0IABL2m6SgzFSJ/PLBWetUKZI68Stjs2vZEA70G w2NONPFKW9mGRHpWN+CpsauStRlQlYkIc0dc9aZVi0dC2/RotEIwCgYIKoZIzj0E AwIDSQAwRgIhAJII64udcXbbPAEytOuWnUTXgfDIsR7rsxpRYefx291hAiEA+1zn 7KrASULcd78oB6cspK8s/jTkMdUTvJjLCT5z4I4= -----END CERTIFICATE-----"
OK
> AT%CMNG=0,94,2,"-----BEGIN EC PRIVATE KEY----- MHcCAQEEIHLeIzVEiySQYNtl2leBFx3aXkYaauYiiIbGrPEUMrOeoAoGCCqGSM49 AwEHoUQDQgAEvabpKDMVIn88sFZ61QpkjrxK2Oza9kQDvQbDY0408Upb2YZEelY3 4Kmxq5K1GVCViQhzR1z1plWLR0Lb9Gi0Qg== -----END EC PRIVATE KEY-----"
OK

# List credentials stored on the modem
> AT%CMNG=1
%CMNG: 42,3,"C52EBBD08F6AD8A65880B7BE6FB4AD2433E8ACF2DFA6D5049DB4E953694DFE20"
%CMNG: 42,4,"4A54721135C8B1E18F57B8987BF9DCEA2E963AA00A43DB714C6A0E59ABC67CE6"
%CMNG: 94,0,"179E968104C294B41BDBF625261E21A4FD9418659328FD47466BE417335C6418"
%CMNG: 94,1,"75BCEFC682DC2302D3BBB45A10D6312F4880C8645A13CB8DDB17F9114E061B1E"
%CMNG: 94,2,"17F17533DC0ED0F8C1687D630FA97A3F422185BECF98A5D73482F4946C44B561"
%CMNG: 1140,0,"BD6681410FB05ECD2B414AFA3B02E285132CD289F9CAD10E5C850FC9888E576E"
%CMNG: 1140,1,"236A8683C0ECF16124112550F93FC2CFCDC41EB0D78878B973157E10E42857F2"
%CMNG: 1140,2,"E88536E17A2758199BEA3333C0D7BF288061021CA39BC460E351297C7C1F0AB6"
%CMNG: 16842753,0,"2C43952EE9E000FF2ACC4E2ED0897C0A72AD5FA72C3D934E81741CBD54F05BD1"
%CMNG: 16842753,1,"0949D3D63F575B92F899C7AFE39DB9C4BCB441341638C160E57ED330C7E3FA98"
%CMNG: 16842753,2,"9DD07BEDECFE0D7B39FA905E58C8C2DDB324FECFFE6AE545F1C7EA568FF331B3"
%CMNG: 515765868,3,"30E13720EE39C620F0F3AFCD983E75A89ED9F9FF948D552CD6D06E8DF8EC8BE9"
%CMNG: 515765868,4,"CEC58801D95548F8A3EEE69B6712D2A3A9B40D2057AF2AA2CE6702E44C585023"
%CMNG: 4294967293,10,"2C43952EE9E000FF2ACC4E2ED0897C0A72AD5FA72C3D934E81741CBD54F05BD1"
%CMNG: 4294967294,6,"A25873CF27F55665C1E404F712580371FF2F6F56C73461638F74CB7428C91D03"
%CMNG: 4294967292,11,"B2C46C2AE7C81943A8BD6DD4ED2A50B659A225A098A177BACB575459CD57CAEF"
OK
When using PSK-ID/PSK, make sure to convert the PSK to a hex string.
Using stored credentials with Golioth
To use the credential that you have stored on the modem, you need to make sure your application is using offloaded sockets and pass a config struct to the Golioth client that indicates the security tag used when storing the credential.
Socket offload can be selected with Kconfig symbols. There is one directive that most Golioth samples use to adjust TLS socket priority that must be removed:
# Ensure socket offload is selected
CONFIG_NET_SOCKETS_OFFLOAD=y

# Remove this line from nrf9160dk_nrf9160_ns.conf (if present):
# CONFIG_NET_SOCKETS_TLS_PRIORITY=35
When starting the Golioth client, pass a struct that indicates the security tag of the credential. This is what associates the certificate or PSK you stored on the modem with the Zephyr TLS stack.
/* Config for credential tag authentication */
struct golioth_client_config client_config = {
    .credentials =
        {
            .auth_type = GOLIOTH_TLS_AUTH_TYPE_TAG,
            .tag = 24,
        },
};
client = golioth_client_create(&client_config);
With the authentication type selected, and the security tag number in place, the offloaded sockets of the nRF91 will automatically used the stored credentials when communicating with Golioth. At the same time you have the peace of mind that, even with access to the hardware, is is not possible for someone to read the credential from storage.
If you run into any issues along the way, we’re ready to help get you unstuck. Start a thread on the Golioth forum.

No comments yet! Start the discussion at forum.golioth.io