TensorFlow Lite is a machine learning (ML) platform that runs on microcontroller-based devices. It’s AI for IoT, which raise a few interesting challenges. Chief among them is figuring out how to update the ML model the device is currently using. Wonder no longer, Golioth has already figured this part out! Let’s walk through how to update a TensorFlow Lite model remotely!
Today’s example is based on the ESP-IDF ecosystem and uses an m5stack CoreS3 board. The application uses a TensorFlow Lite learning model to recognize when you speak the words “yes” and “no”. After performing an over-the-air (OTA) update of the learning model, the words “stop” and “go” will also be recognized.
What is a TensorFlow Lite Model?
Applications that use TensorFlow Lite need a machine learning model that has been trained on a large data set. TensorFlow (TF) can run on microcontrollers because this learning model has already been trained using vastly greater processing power. The “edge” device can use this pre-trained model, but will not be able to directly improve the learning set. But that set can be updated in the field.
Golioth has a TensorFlow Model Update example application that updates the TF learning model whenever a new version is available on the cloud. In this way, you can train new models and deploy them to a fleet of devices. If you capture data on device and send it up to Golioth, you can use your live captures to also train new models like Flox Robotics does.
Overview of the Model Update Process
The basic steps for updating a TensorFlow model are as follows:
- Upload a new learning model as an Artifact on Golioth.
- Roll out a release that includes your model as a non-firmware artifact.
- You can update your Model all by itself without performing a full firmware update.
- Device recognizes and downloads the newly available version.
- Device re-initializes the TensorFlow application to use the new model.
The ability to upload the model separately from the device firmware delivers a few benefits. It saves bandwidth and power budget as the download will take less time to download. You will also be tracking fewer firmware versions as the model will be versioned separately.
Core Concepts from the Golioth Firmware SDK
There are two core concepts from the Golioth Firmware SDK used in this example. The first is that an IoT device can register to be notified whenever a new release is available from the cloud.
/* Register to receive notification of manifest updates */
enum golioth_status golioth_ota_observe_manifest_async (struct golioth_client *client, golioth_get_cb_fn callback, void *arg)

/* Convert the received payload into a manifest structure */
enum golioth_status golioth_ota_payload_as_manifest (const uint8_t *payload, size_t payload_size, struct golioth_ota_manifest *manifest)
The second concept is the ability to retrieve Artifacts (think binary files like a firmware update or a new TF Lite model) from Golioth.
/* Use blockwise download to retrieve an Artifact */
enum golioth_status golioth_ota_download_component (struct golioth_client *client, const struct golioth_ota_component *component, ota_component_block_write_cb cb, void *arg)
These two concepts are applied in the Golioth TF Lite example to detect when a new model is available, download it to local storage, and begin using it in the application. While this example uses ESP-IDF, the Golioth Firmware SDK also works with Zephyr and ModusToolbox.
Model Update Walk Through
1. Upload your new TensorFlow Model to Golioth
This step couldn’t be simpler: head over to the Golioth web console, navigate to Firmware Updates→Artifacts, and click the Create button.
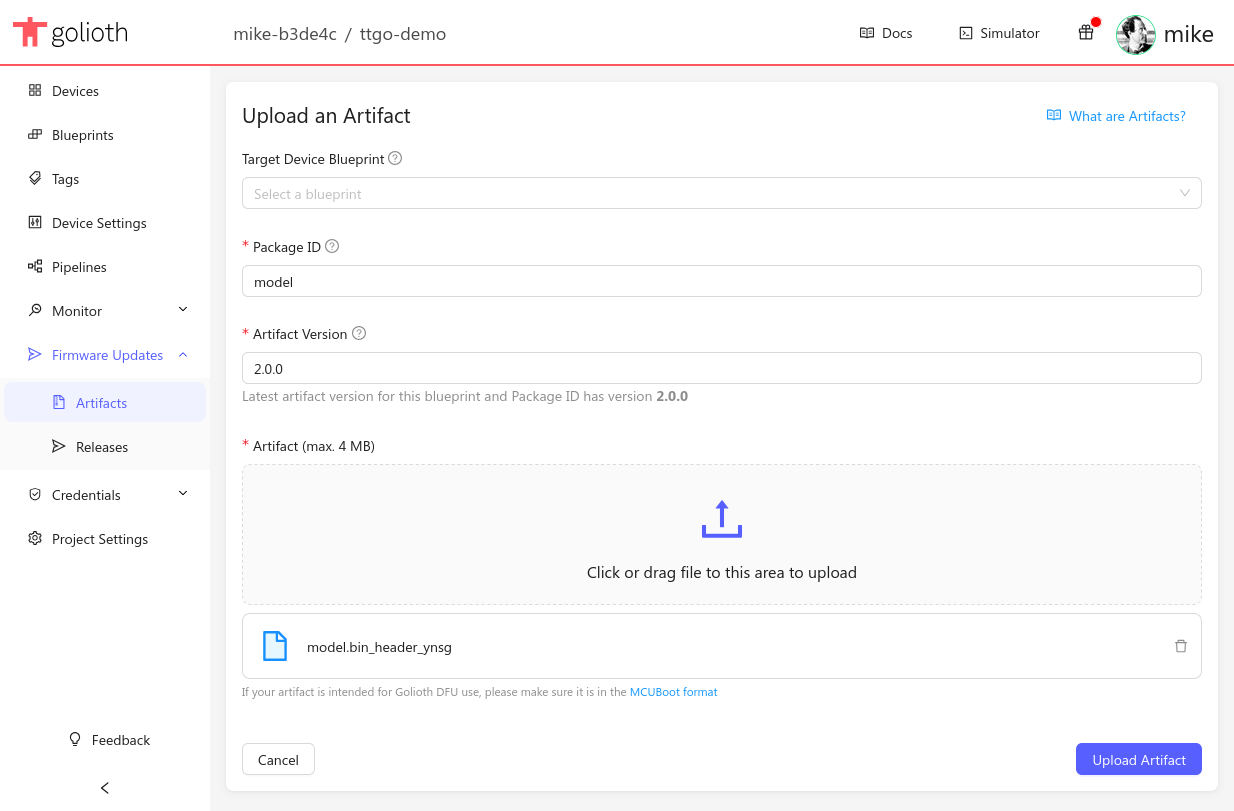
Give the artifact a Package ID that the device will use to recognize it as a new model. Here I’ve used the clever name: model.
Each file you upload requires an Artifact Version number that follows the semantic versioning syntax (ie. v1.2.3). Once you’ve filled in these fields select the file you want to upload and click Upload Artifact.
2. Roll out a release of the new Model
Rolling out your new model to devices is even easier than the upload step. Navigate to Firmware Updates→Releases and click the Create button.
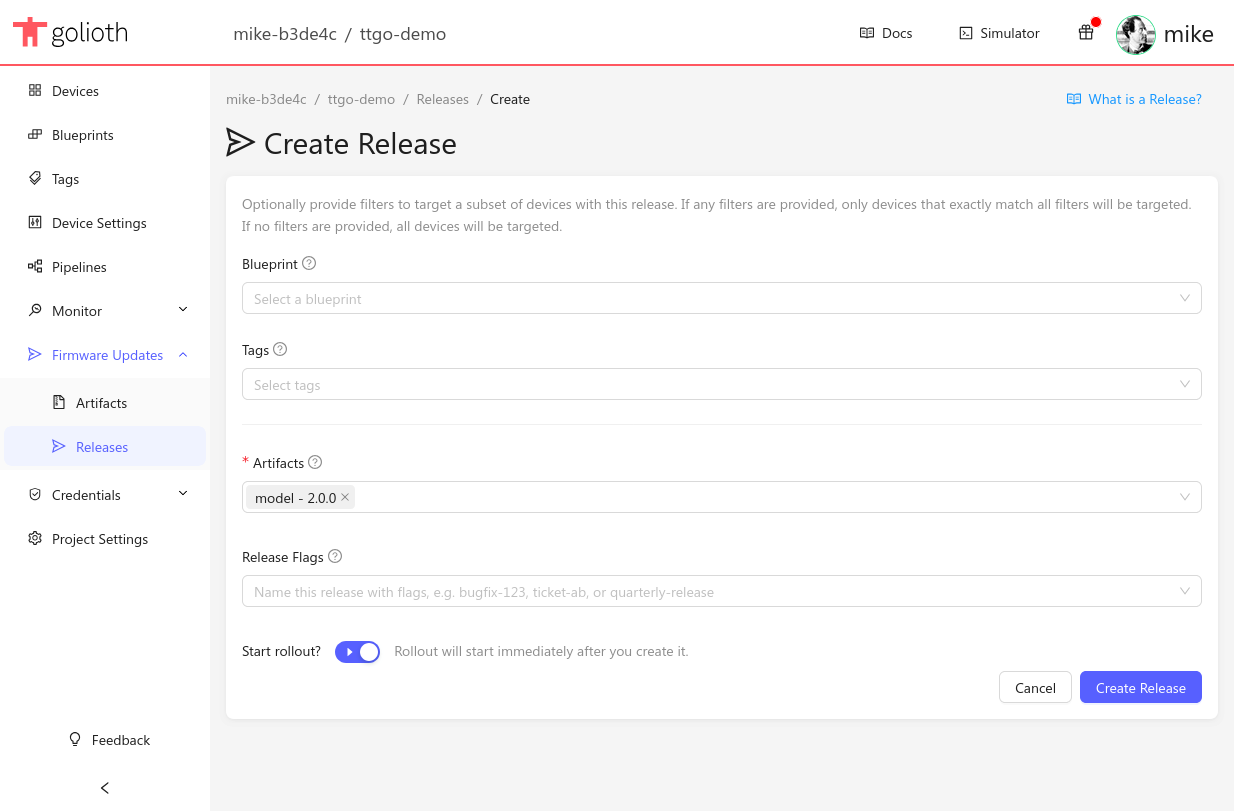
Under the Artifacts dropdown menu, select the artifact created in the previous step (note the package name and version number). I have also enabled the Start rollout? toggle so that this release will be immediately available to devices once the Create Release button is clicked.
This will roll out the model to all devices in the fleet. However, the Blueprint and Tags fields may optionally be used to target to a specific device or group of devices.
3. Device-side download and storage
Learning models tend to be large, so it’s a good idea to store the model locally so that it doesn’t need to be re-downloaded the next time the device goes through a power cycle. However, the process is the same no matter what approach you take. The model will be downloaded in blocks, using a callback function your app supplies to place the block data into some storage location.
There is a bit of a song and dance here to avoid deadlocking callbacks. The first step is to register a callback when a new release manifest is received from Golioth:
/* Listen for OTA manifest */
int err = golioth_ota_observe_manifest_async(client, on_manifest, NULL);
Here’s the on_manifest callback with all the error checking and most of the logging removed for brevity. Since this is running in a callback, I push the desired manifest component into a queue which will be read later from the main loop.
#define MODEL_PACKAGE_NAME "model"

static void on_manifest(struct golioth_client *client,
                        const struct golioth_response *response,
                        const char *path,
                        const uint8_t *payload,
                        size_t payload_size,
                        void *arg)
{
    struct golioth_ota_manifest man;

    golioth_ota_payload_as_manifest(payload, payload_size, &man);

    for (int i = 0; i < man.num_components; i++)
    {
        if (strcmp(MODEL_PACKAGE_NAME, man.components[i].package) == 0)
        {
            struct golioth_ota_component *stored_component =
                (struct golioth_ota_component *) malloc(sizeof(struct golioth_ota_component));
            memcpy(stored_component, &man.components[i], sizeof(struct golioth_ota_component));

            xQueueSendToBackFromISR(xQueue, &stored_component, NULL);
        }
    }
}
Next, we have a function to perform the download of the components in the queue. I’ve removed some housekeeping code to make this more readable. At its core, this function gets a pointer to write the file to an SD card, generates the path and filename, then begins a block download using write_artifact_block as a callback for each block received.
static void download_packages_in_queue(struct golioth_client *client)
{
    while (uxQueueMessagesWaiting(xQueue))
    {
        struct golioth_ota_component *component = NULL;
        FILE *f = NULL;

        /* Store components with name_version format: "componentname_1.2.3" */
        size_t path_len = sizeof(SD_MOUNT_POINT) + strlen("_") + strlen(component->package)
            + strlen("_xxx.xxx.xxx") + strlen("\0");

        char path[path_len];
        snprintf(path,
                 sizeof(path),
                 "%s/%s_%s",
                 SD_MOUNT_POINT,
                 component->package,
                 component->version);

        GLTH_LOGI(TAG, "Opening file for writing: %s", path);
        f = fopen(path, "a");

        /* Start the block download from Golioth */
        golioth_ota_download_component(client, component, write_artifact_block, (void *) f);

        fclose(f);
        free(component);
    }
}
Here’s the full block callback function. It’s quite straight-forward. The Golioth SDK will repeatedly run the callback; each time it is called, your application needs to write the data from block_buffer to a storage location.
Normally the offset for each write is calculated by multiplying the block_idx by the block_size. However, since I’ve passed a file stream pointer in as the user argument, we simply make subsequent writes and the file pointer will increment automatically.
static enum golioth_status write_artifact_block(const struct golioth_ota_component *component,
                                                uint32_t block_idx,
                                                uint8_t *block_buffer,
                                                size_t block_size,
                                                bool is_last,
                                                void *arg)
{

    if (!arg)
    {
        GLTH_LOGE(TAG, "arg is NULL but should be a file stream");
        return GOLIOTH_ERR_INVALID_FORMAT;
    }
    FILE *f = (FILE *) arg;

    fwrite(block_buffer, block_size, 1, f);

    if (is_last)
    {
        GLTH_LOGI(TAG, "Block download complete!");
    }

    return GOLIOTH_OK;
}
The new Model is now stored as a file on the SD card, named to match the package name and version number. This is quite handy for troubleshooting as you can pop out the SD card and inspect it on a computer.
4. Switching to the new model on the device
Switching to the new model is where you will likely spend the most time making changes on your own application. I was working off of the TensorFlow Lite micro_speech example from Espressif which hardcodes several of the parameters relating to loading and using a learning model.
The approach that I took was to move the pertinent learning model settings to RAM and load them from a header that was added to the model. This header formatting is explained in the README for the Golioth example. In our example code, the bulk of this work is done in model_handler.c.
For your own application, keep in mind any variables necessary to load a new model and how those may change with future training updates.
Take Golioth for a Spin!
Golioth is free for individuals, with usage pricing that includes 1 GB per month of OTA data. So you can get small test fleet up and running today before seeking budget approval.
Those interested in pushing sensor data back up to the cloud for training future models will find our examples on uploading audio and uploading images helpful. We’d love to hear your questions or just see what cool things you’re working on, so take a moment to post your progress to the Golioth forum.

No comments yet! Start the discussion at forum.golioth.io